
Every AI video workflow eventually reaches the same frustrating moment. You’ve generated a scene that’s 90% perfect — the framing is right, the character’s pose is right, the timing is right — but one element is wrong. Maybe the background doesn’t match the previous shot. Maybe the character’s jacket is the wrong color. Maybe the lighting is too harsh, or a prop is missing from the table.
With traditional generation, your only option is to regenerate the entire scene and hope everything else stays the same. That means waiting another five to fifteen minutes, burning another generation cycle, and risking that the new version introduces different problems you didn’t have before. The 90%-perfect scene becomes a gamble, and you often end up accepting a worse result because the cost of trying again is too high.
The V2V Editor — Video-to-Video — exists to eliminate that gamble. It lets you retouch any existing video with AI, replacing backgrounds, adding elements, or applying a new style to just the portion you need to change, without regenerating the entire scene from scratch.
What Video-to-Video Actually Does
The name describes the mechanism precisely: you feed an existing video into the AI as a starting point, along with a text prompt and reference images describing what should change, and the system produces a modified version. The original motion, timing, and composition are preserved as the foundation. Only the elements you specify are altered.
This is fundamentally different from text-to-video generation, where the AI starts from nothing and invents every frame. In V2V, the AI starts from your rendered footage and treats it as a constraint. That constraint is what makes the results coherent: the character keeps walking the way they were walking, the camera keeps moving the way it was moving, and the scene keeps its rhythm. You’re not replacing the scene — you’re editing it.
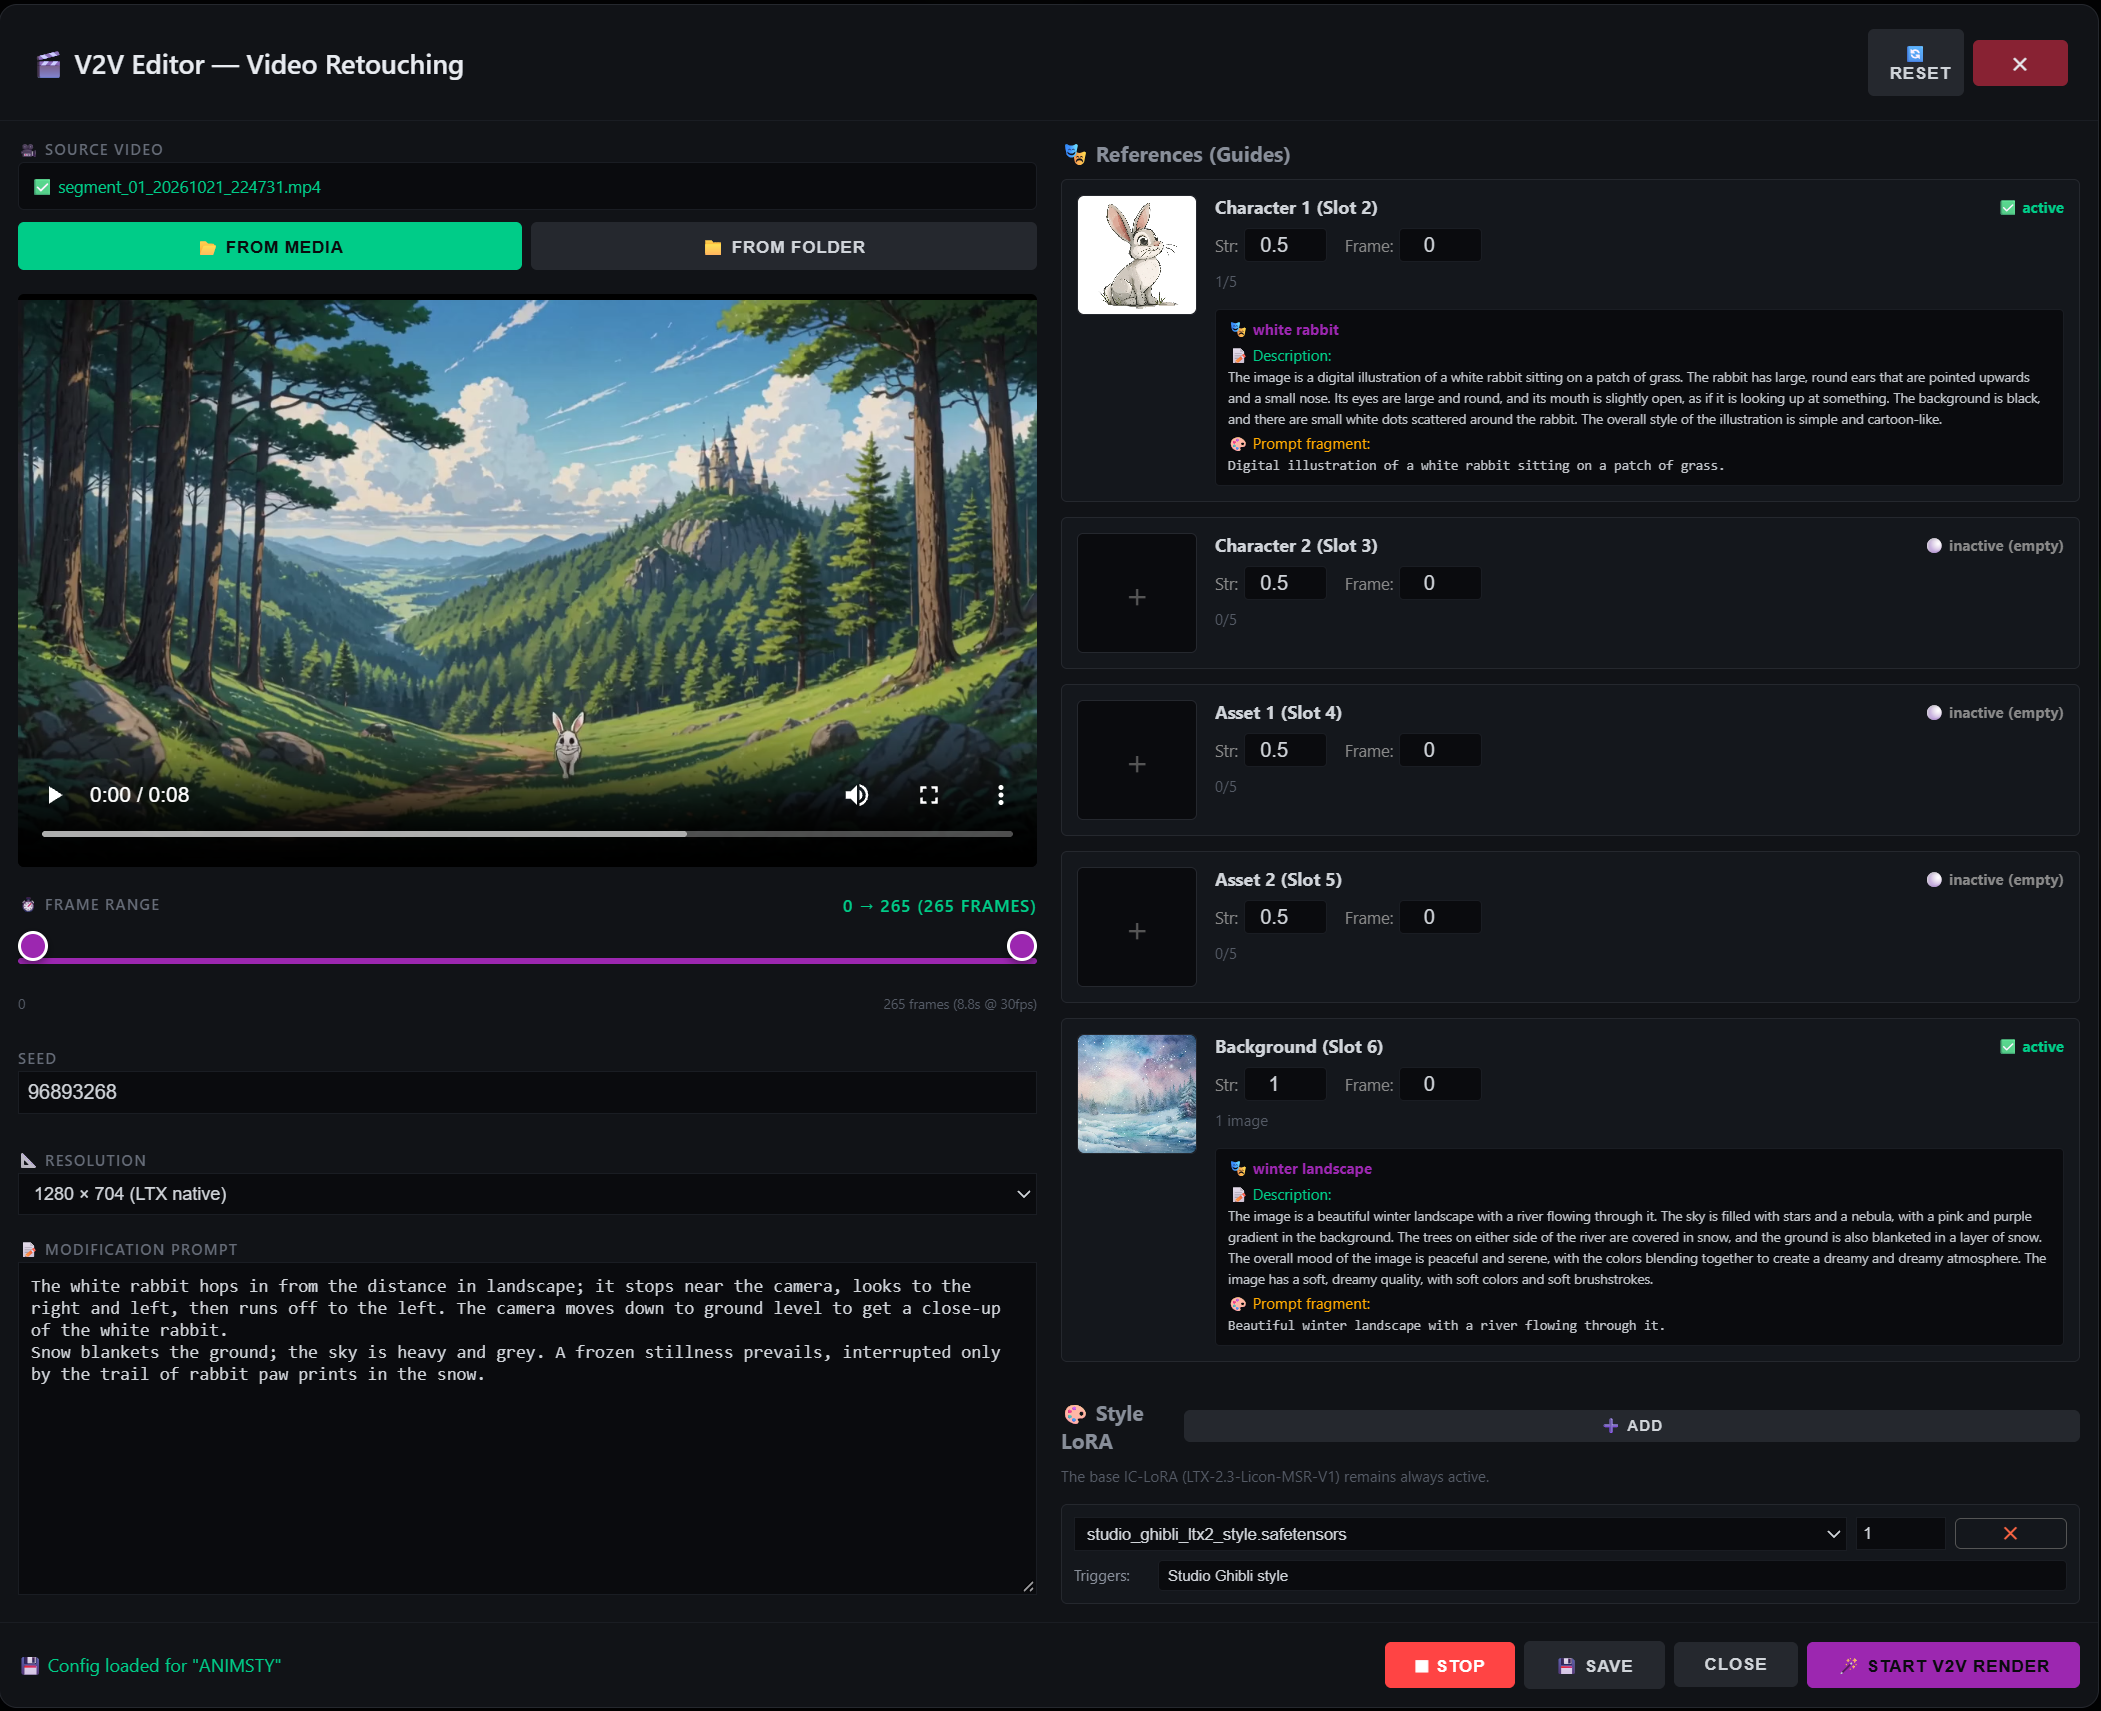
The Editor lives in the Images panel header, next to the Compositing, Angles, and Remove BG buttons. Click 🎬 V2V EDITOR to open it.
Step One: Choose and Trim Your Source
You can load a source video two ways: 📂 From MEDIA picks an existing video from your project’s media library, showing a grid of 16:9 thumbnails, while 📁 From folder uploads a video from your local disk, automatically copying it to ComfyUI’s input folder. When you pick a video, the editor extracts its duration and adjusts the maximum frame range for the trim sliders.
That trim step is more important than it looks. A double slider below the preview lets you select the exact portion of the video you want to retouch — the left handle sets the start frame, the right handle sets the end frame, and the label above shows the range in frames. There’s no reason to process the whole clip if only three seconds of it need fixing. Trimming saves both processing time and VRAM, and the guide is explicit about this: trim only the part you actually need to modify.
Step Two: Write the Modification Prompt
In the Modification Prompt box, you describe what you want to change. The prompt must contain at least ten characters, but the real guidance is about specificity: name the subject, the action, and the style. A vague prompt like “make it better” will produce vague results. A prompt like “replace the background with a rainy city street at night, keep the character’s pose and clothing unchanged” gives the AI something concrete to work with.
This is the one place where V2V demands more from you than the rest of the Latent Core workflow. In storyboard mode, the AI builds prompts from your script automatically. In V2V, you’re writing the prompt yourself — and the quality of the result tracks the quality of the instruction.
Step Three: Assign Reference Images to Slots
The V2V workflow uses five reference slots, each linked to a specific node in the ComfyUI graph:
- Character 1 (Node 2) — main character replacement
- Character 2 (Node 3) — second character replacement
- Asset 1 (Node 4) — first object or prop
- Asset 2 (Node 5) — second object or prop
- Background (Node 6) — environment replacement
For each slot, you click the thumbnail to open a sub-slot and can assign up to five images — Face, Back, Face 2, Full Back, and Extra — each with its own Strength (0 = disabled, 0.5 = normal, 5 = max) and Frame Index (at which frame the guide is injected). Empty slots are automatically disabled, so you only fill the ones you actually need. The workflow duplicates images and sets strength to zero on the rest, handling the housekeeping for you.
When you select an image for a slot, the editor displays the asset’s description and prompt fragment below it, so you can see exactly what the AI will “see” in the reference. If the description is off, you can edit it in the Asset Manager and improve future generations as well as this one.
Step Four: Add Style LoRAs
Below the slots, you can add up to N style LoRAs to influence the visual character of the output. The base IC-LoRA (LTX-2.3-Licon-MSR-V1) is always active, and additional LoRAs are chained in the workflow. Each gets a strength setting — 0 for off, 1 for normal, 2 for strong — so you can dial in a look without overwhelming the underlying content.
Step Five: Choose Resolution and Render
Six predefined resolutions are available, each mapped to a VRAM requirement and a use case:
- 512×288 (~6 GB) — quick test, very fast
- 768×448 (~10 GB) — draft preview
- 960×544 (~12 GB) — light production
- 1024×576 (~14 GB) — standard 16:9
- 1280×704 (~18 GB) — LTX native, the default
- 1536×864 (~22 GB) — high quality
- 1920×1088 (~24 GB) — for RTX 3090, 4090, or 5090
The guide’s advice here is practical: start small. Use 512×288 to test whether the prompt and references produce the effect you want, then scale up once you’re satisfied. There’s no point burning a 24 GB render on a prompt that needs rewording.
When you click Start V2V Render, the button becomes ⏳ Rendering… and disables, while the always-visible ⏹ STOP button becomes active. Progress appears in the browser console and the server log.
The STOP Button: Freedom to Abort
The STOP button deserves its own section, because it changes the psychology of rendering. It’s always visible and always active, and clicking it does four things at once: it aborts the HTTP request via AbortController, sends an /interrupt signal to ComfyUI, clears the ComfyUI queue, and restores the UI immediately.
The dual mechanism — frontend abort plus backend interrupt — means that even if the browser freezes, the GPU is freed. You’re never locked into waiting for a render that’s clearly going wrong. If the preview looks wrong after thirty seconds, you stop it and try again. That freedom is only possible because the generation is local and the marginal cost is zero; under a token-based model, aborting a render means wasting money, and users learn to endure bad results rather than restart.
Auto-Save and Background Management
The V2V Editor saves its configuration 800 milliseconds after the last change, storing it in session.json under v2v_config, per project. You can close the modal at any time and your settings will be restored when you reopen it.
Background management is handled automatically. If a reference image is missing from ComfyUI’s input folder, it’s copied from your project’s images or assets folder. If an image is completely missing, a fallback is used. All copies and replacements are logged in the console. This means you can clean the ComfyUI input folder at any time without breaking your V2V configuration — the editor repopulates it before each render.
Debugging and Workflow Logging
When a render starts, the server logs the full workflow in the console: a summary of the source video, resolution, frames, seed, prompt, guides, and LoRAs, followed by the complete JSON payload sent to ComfyUI and a node-by-node record of modifications. This is genuinely useful for debugging a render that isn’t producing the expected result — you can see exactly which reference image landed in which slot, at what strength, and at what frame.
Practical Advice for Better Results
The User Guide closes its V2V section with a set of tips worth repeating, because they reflect real experience:
- Trim the source video to the relevant segment — it saves VRAM and time.
- Start small at 512×288 to test the prompt, then scale up.
- Fill only the slots you need — empty ones are auto-disabled.
- Use moderate strength: 0.5 for characters and 0.6 for backgrounds; values above 2.0 risk overpowering the render.
- Test with the seed set to 0 first, then lock a good seed once you find one.
- Use the STOP button immediately if the preview looks wrong — there’s no reason to wait.
Why This Changes Post-Production
The V2V Editor fills a gap that cloud tools handle poorly. In a cloud workflow, post-production retouching usually means regenerating the whole clip with a modified prompt and hoping the rest stays the same — an expensive, unreliable approach. In Latent Core, it means loading the clip, selecting the frames that need work, describing the change, assigning the references, and rendering only that segment.
The result is a workflow where a scene can be refined incrementally rather than recreated wholesale. The 90%-perfect scene doesn’t need to be thrown away; it needs to be edited. And because the editing happens locally, with no per-second fees and a STOP button that frees the GPU instantly, you can iterate until it’s right.
Leave a Reply
You must be logged in to post a comment.