

LatentCore: The AI Video Studio That Runs Entirely on Your Machine
Cloud AI video tools charge by the second, limit your creativity, and keep your content on their servers. LatentCore flips the model: a complete AI video production suite that transforms a single topic into a full video 100% locally — no token costs, no subscription, no compromise.
What Is LatentCore?
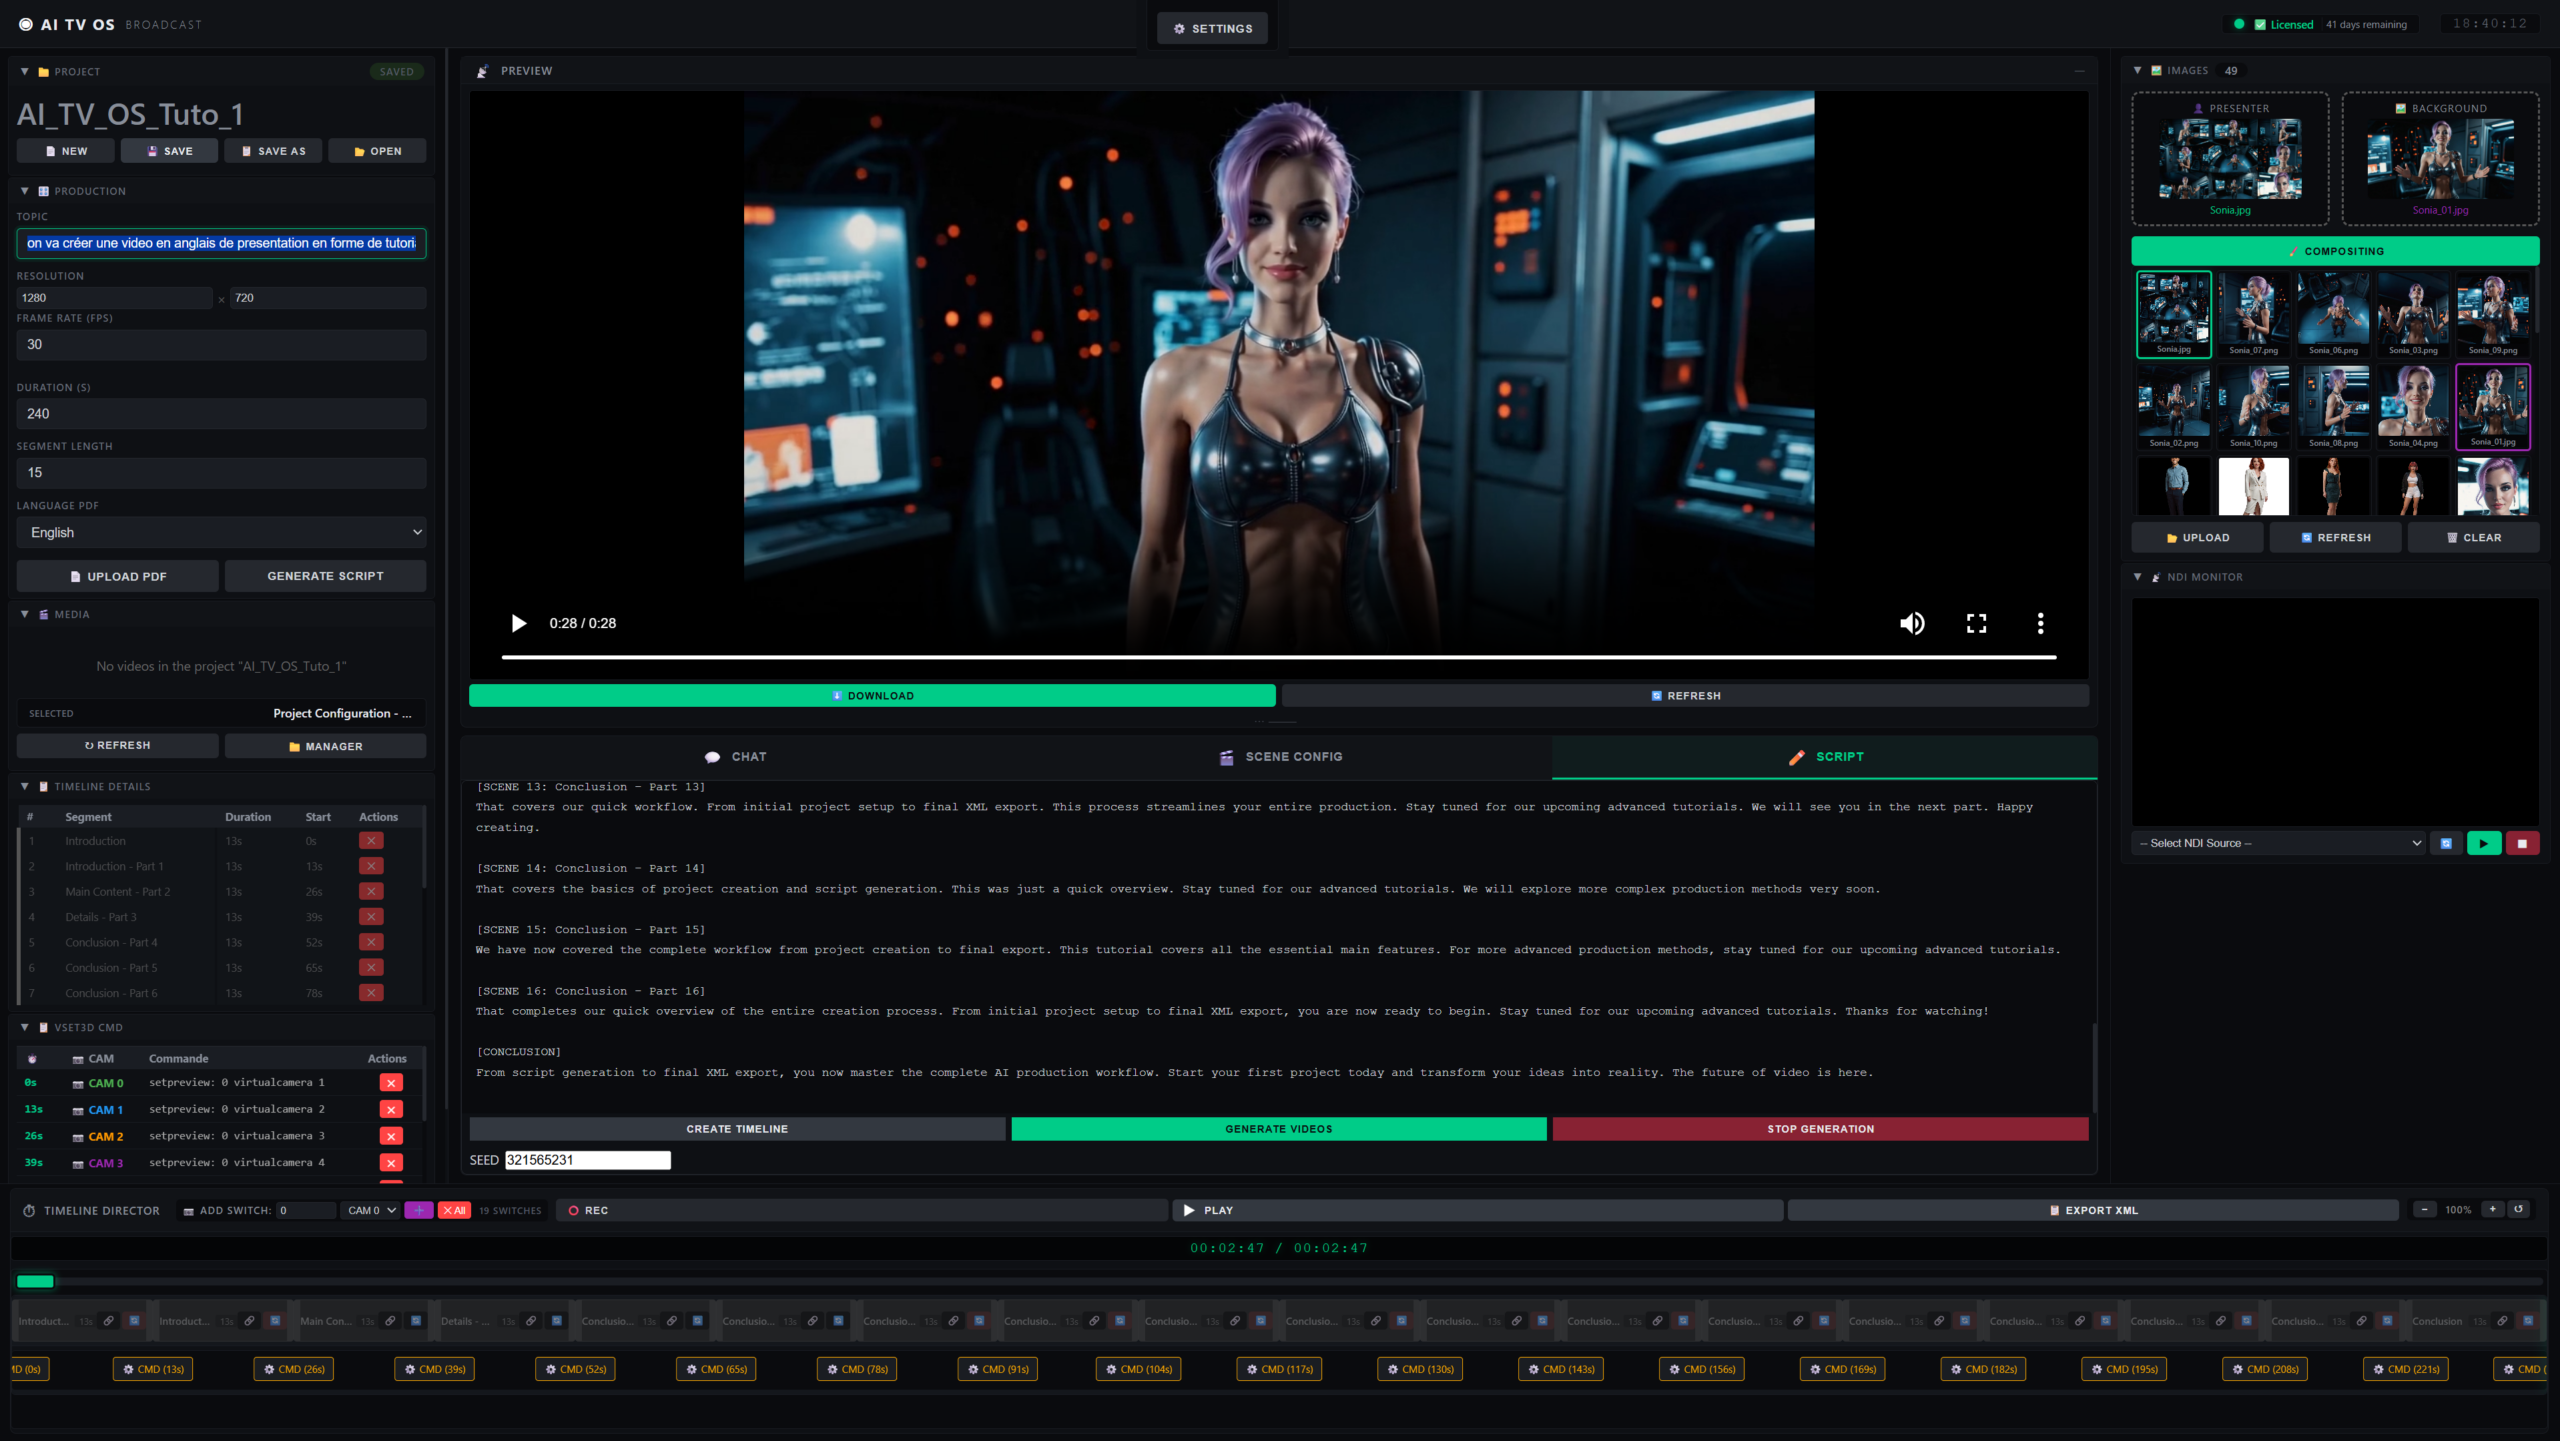
LatentCore is an AI-powered video production studio built for creators, broadcasters, production studios, corporate teams, and educational institutions. It lets you write a script automatically from a simple topic or a PDF, generate videos with a virtual presenter on green screen, manage a library of characters, locations, and objects, and export the final timeline to DaVinci Resolve.
What sets it apart is its architecture: the scriptwriting AI runs locally via Ollama, and the video generation engine runs locally via ComfyUI. Your scripts, presenter images, and raw videos never leave your machine. Generate ten videos or a thousand — the price stays the same.
From Idea to Final Video in Three Steps
The workflow is deliberately simple. No technical skills required — the guide walks you through everything step by step.
Generate the Script
Type any topic or import a PDF. The AI writes a structured script and builds a timeline with editable durations.
Choose Your Assets
Select reference images, backgrounds, and characters from your library. The AI detects them in the script.
Generate the Videos
LatentCore renders each segment automatically. Review, refine, and export the final timeline.
A Tour of the Interface
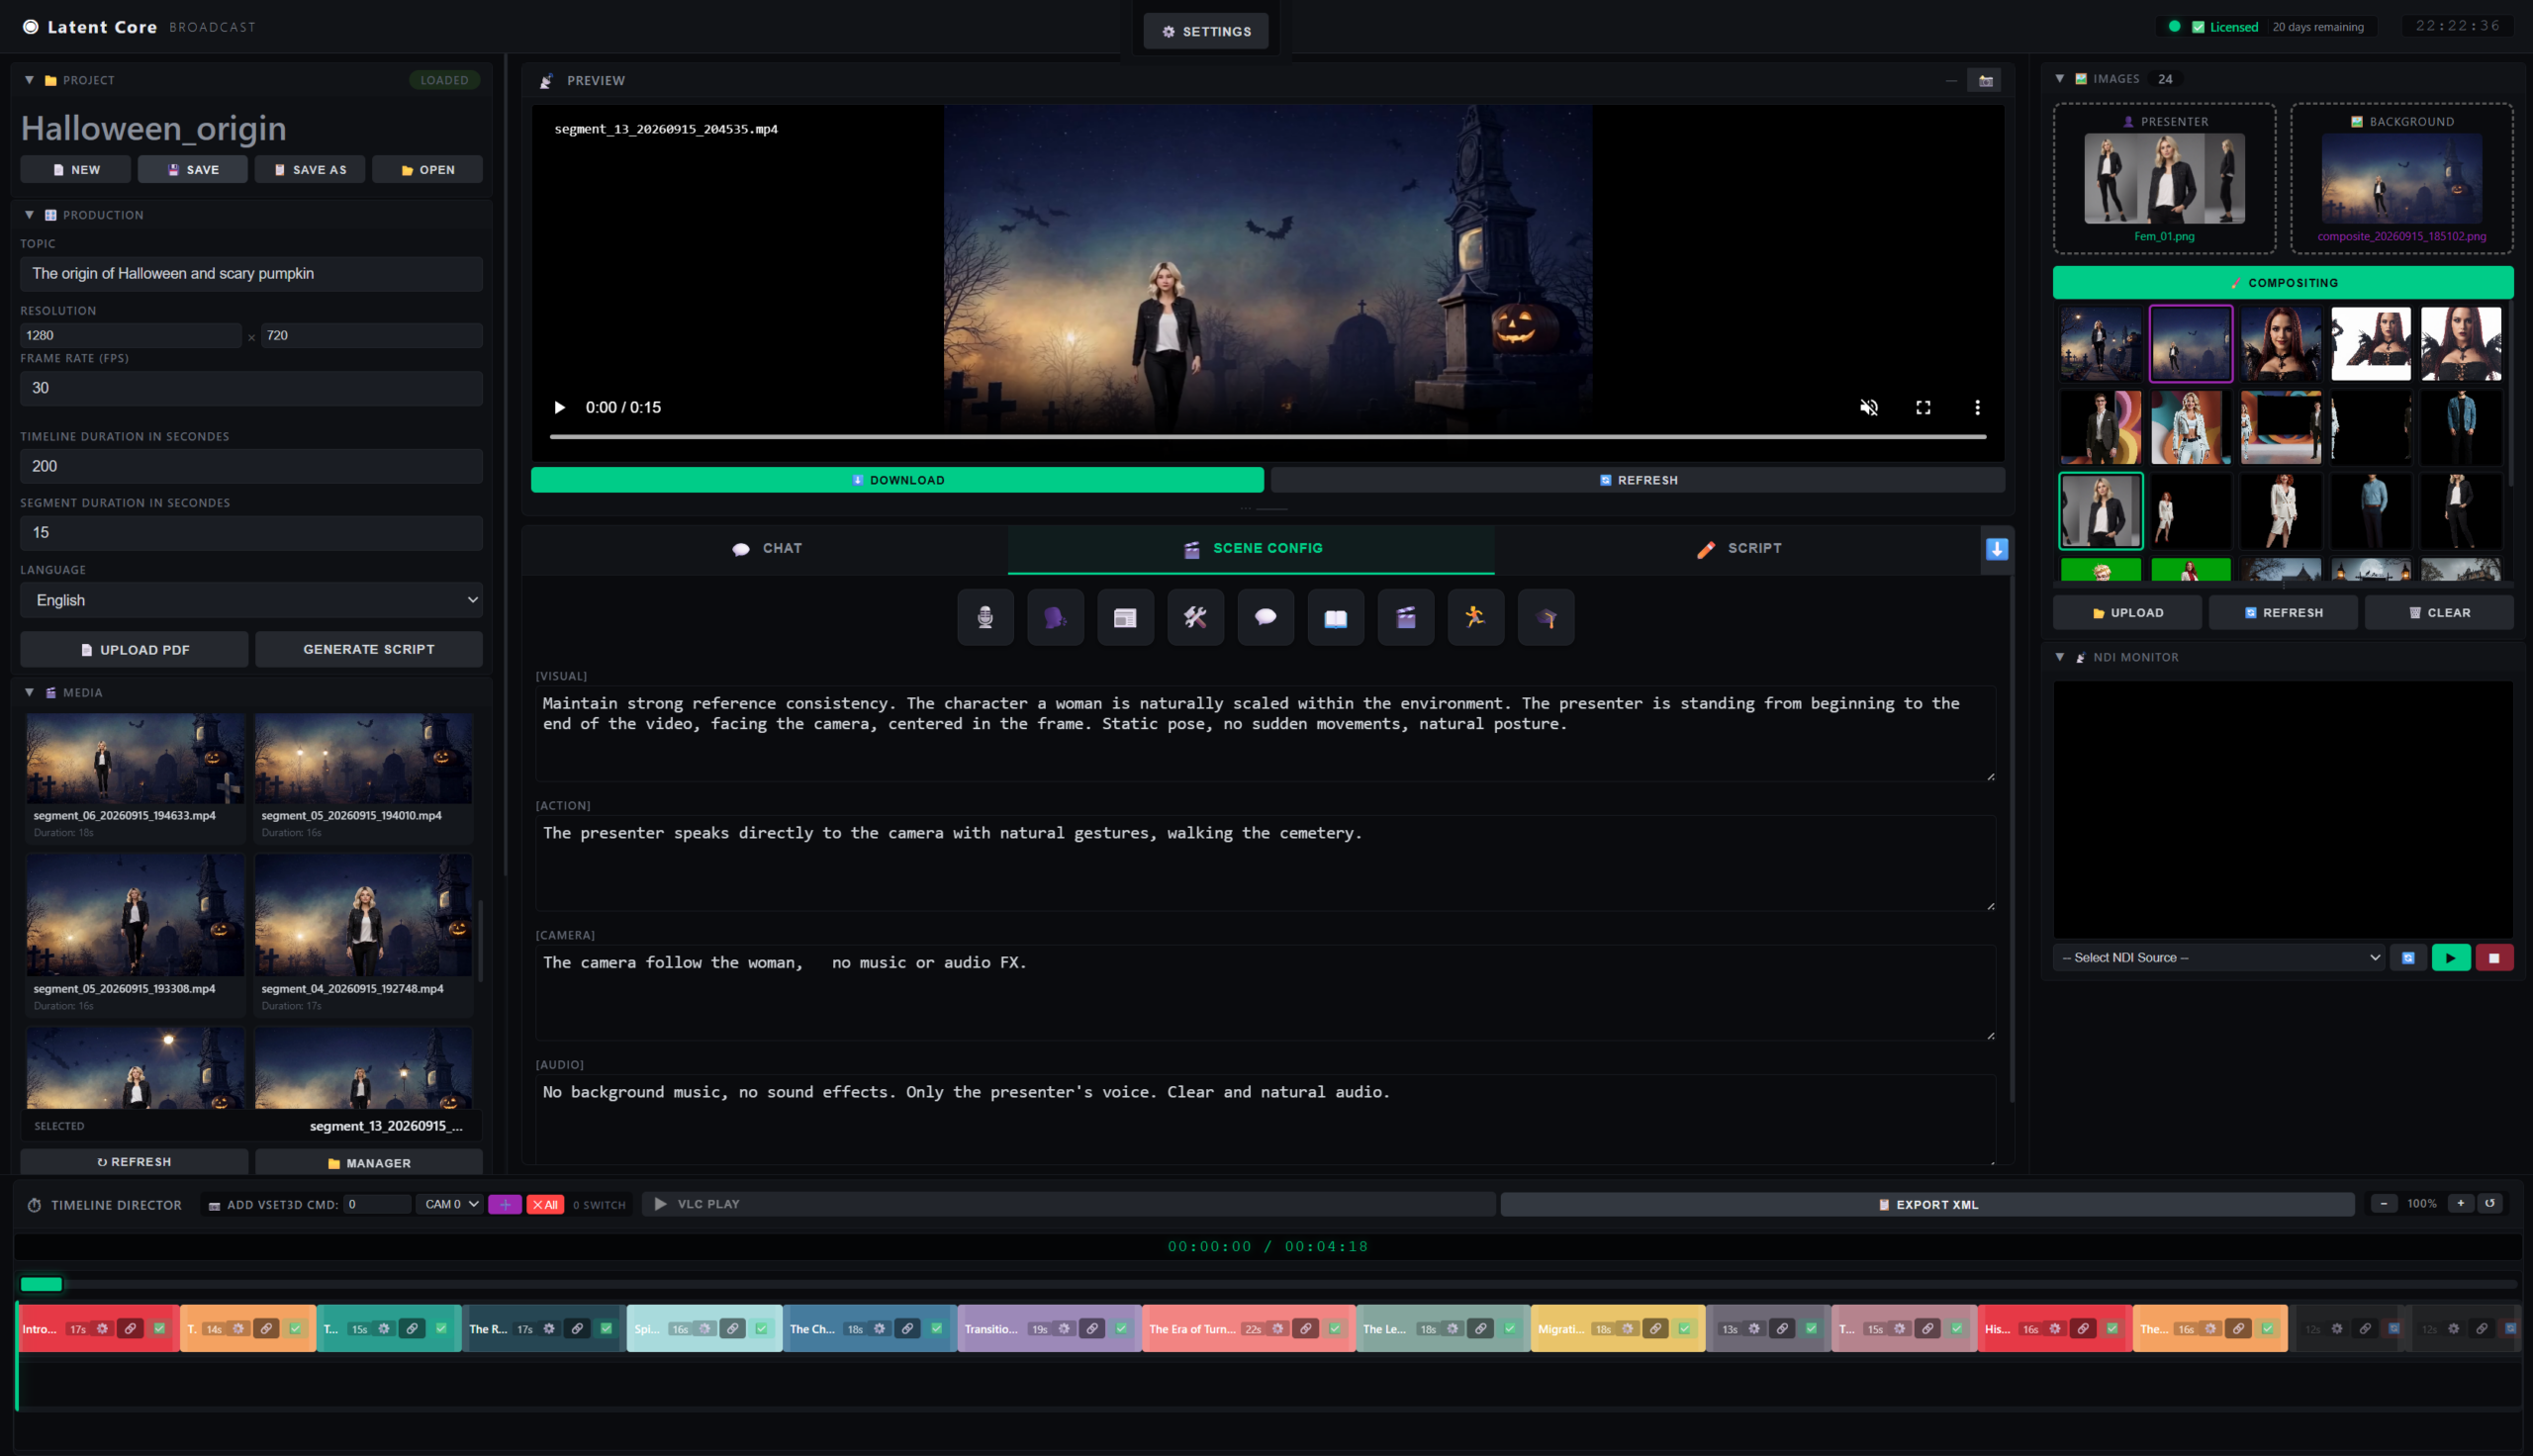
The screen is organized into four main areas: a left panel for project and production controls, a central preview with Chat / Config / Script tabs, a right panel for assets, images, NDI, and FreeD, and a timeline at the bottom where your segments are aligned in time.
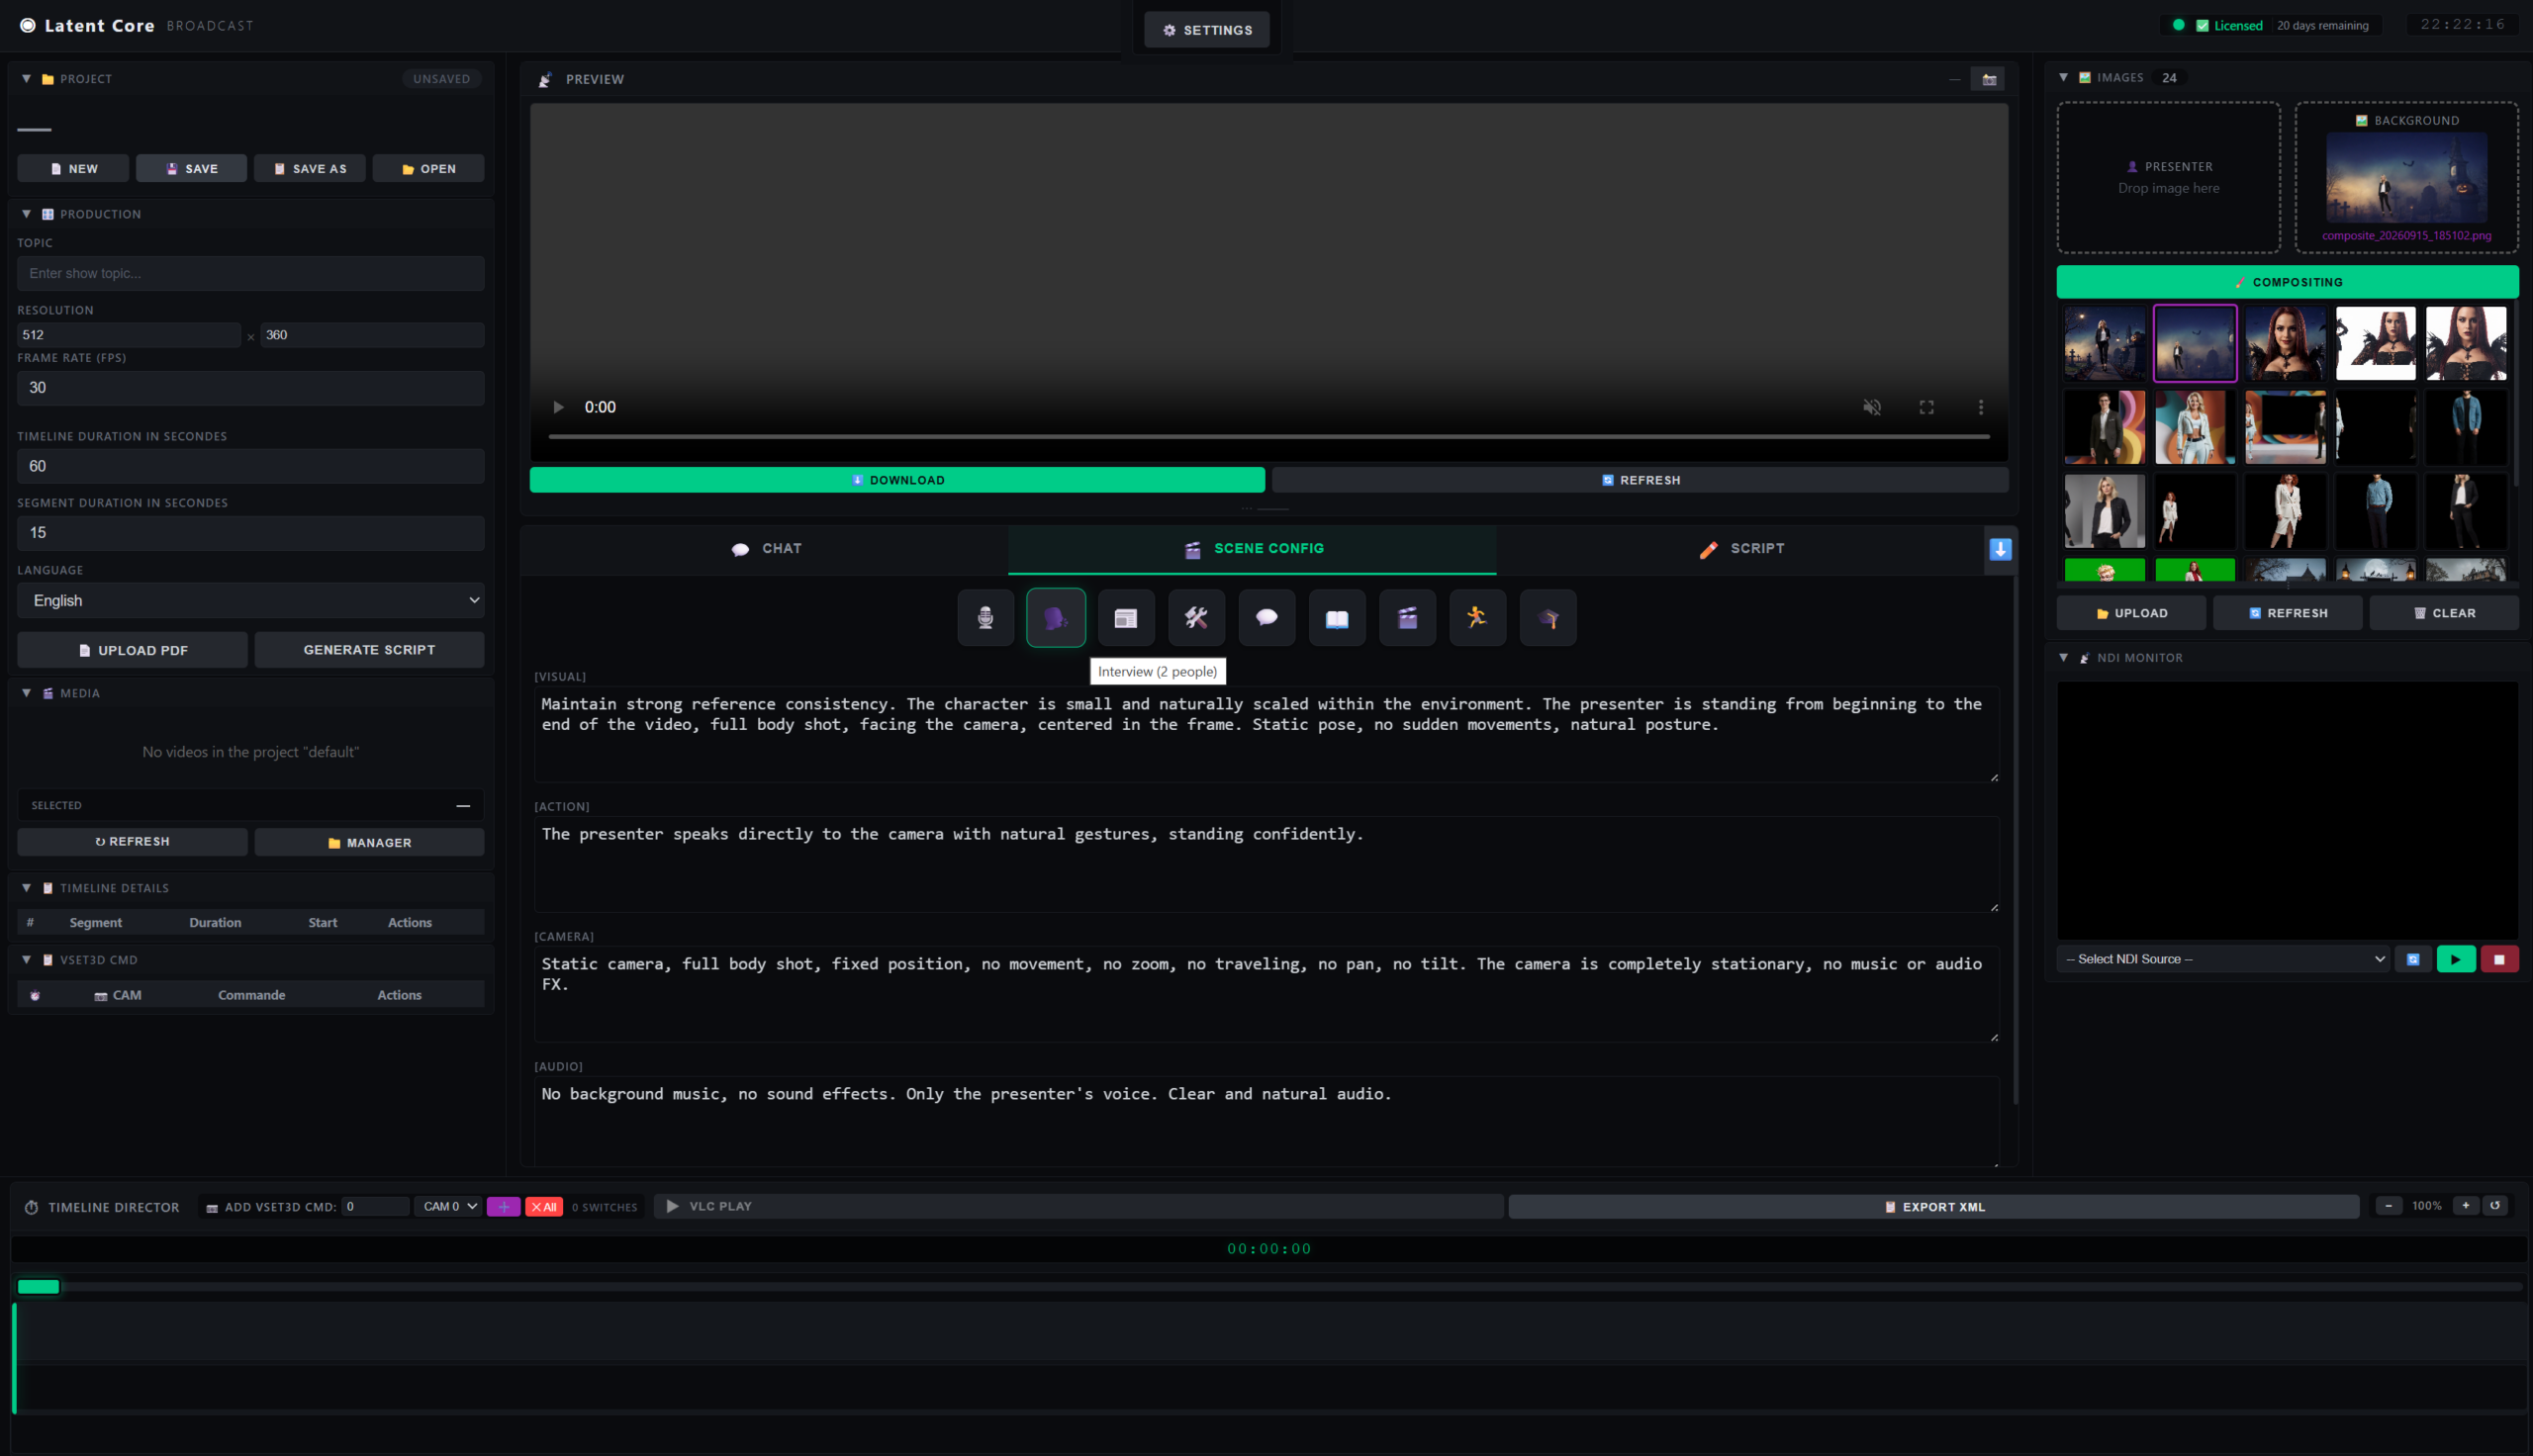
Left panel — controls
- PROJECT: create, save, open a project
- PRODUCTION: topic, resolution, duration → generate a script
- MEDIA: list of generated videos
- TIMELINE DETAILS: segment breakdown
- VSET3D CMD: camera switch commands
Central area
- Video preview at the top
- CHAT: converse with the AI (rewrite a scene, add a segment, shorten the conclusion)
- SCENE CONFIG: visual style, LoRA, camera behavior
- SCRIPT: view and edit the script directly
Right panel and timeline
- Assets: characters, locations, objects library
- Images: reference photos with source filter (All / Images / Assets)
- Bins: folders to organize your images and assets
- NDI Monitor: real-time network video monitor
- FreeD Tracker: virtual camera control for 3D sets
- Timeline: play, stop, OBS record, export XML
Asset Manager: Visual Continuity Across Shots
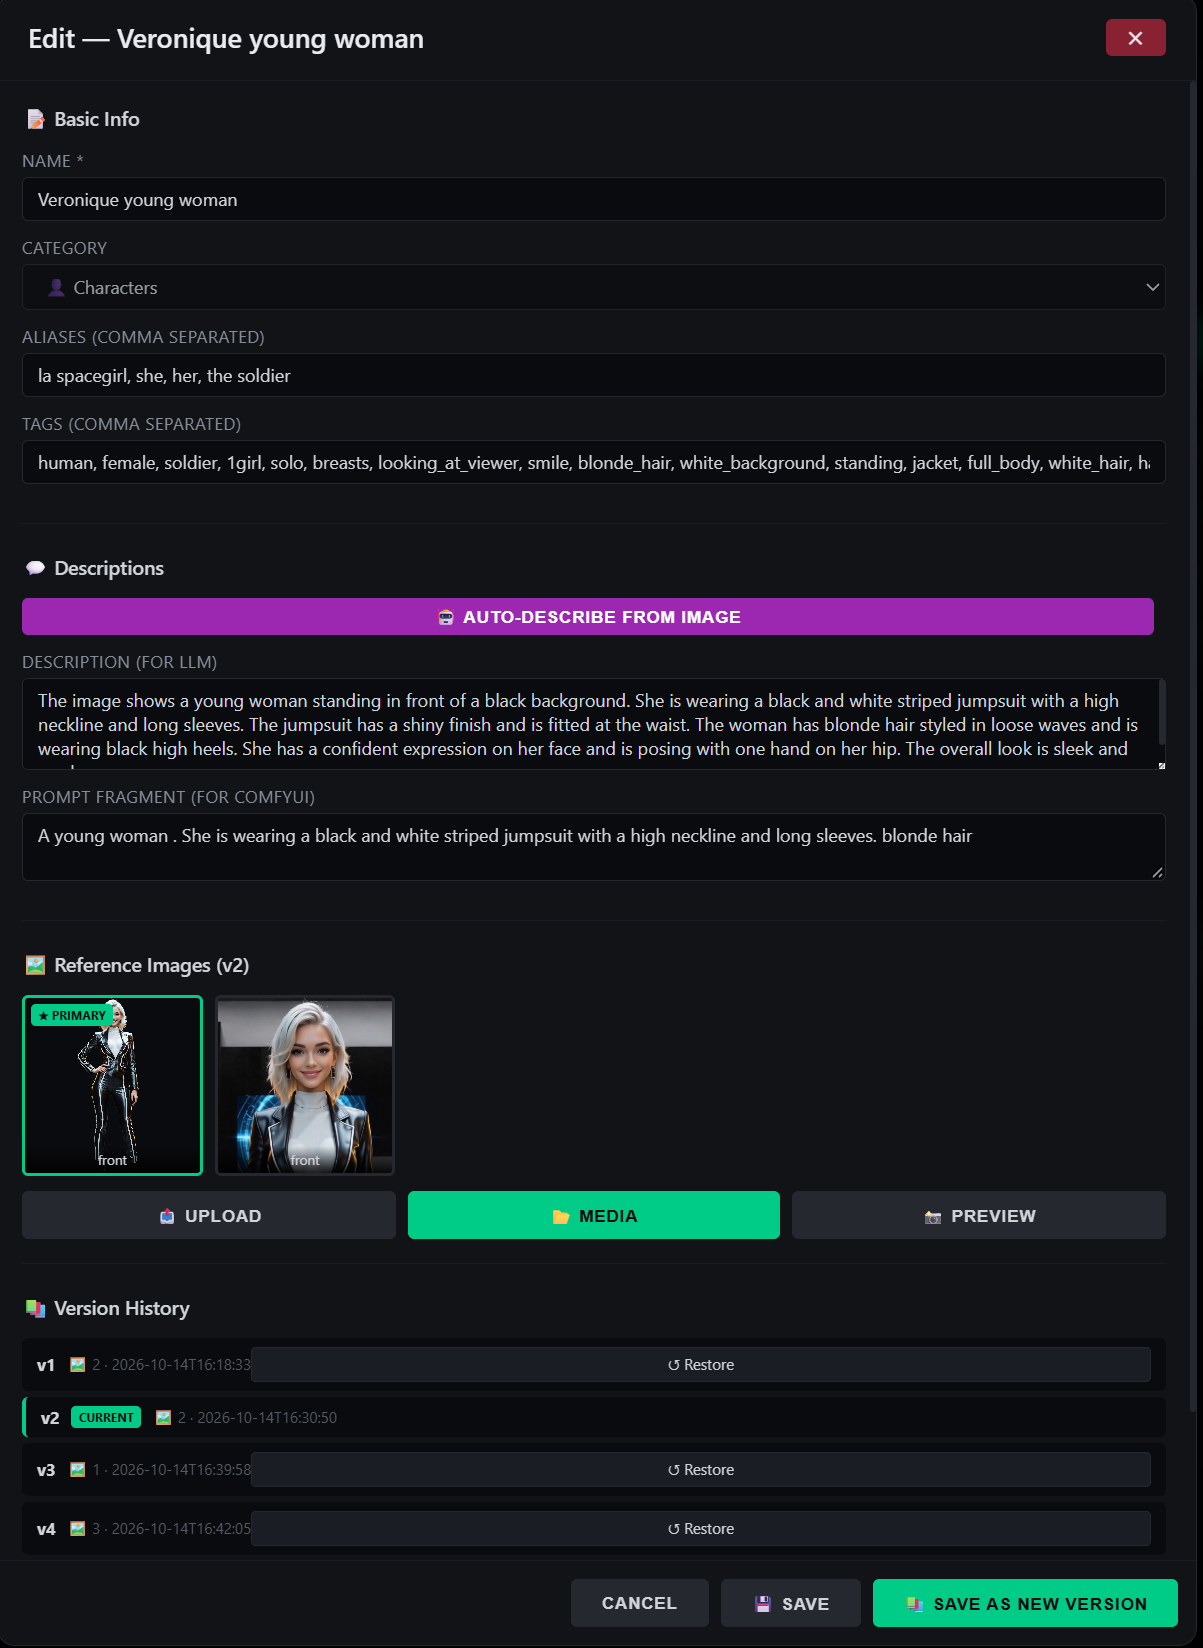
The Asset Manager is where LatentCore earns its keep. It lets you build a library of characters, locations, and objects that the AI can detect in your scripts and use automatically during video generation.
Creating an asset
Click + New Asset, give it a name (e.g. “Sonia”), choose a category (Character, Location, Object), and add aliases — “she, her, the biologist” — so the resolver can match it in the script. Add reference images via Upload, Media, or Preview (capture the current frame), then click Auto-Describe to let Florence-2 + WD14 fill in the description, prompt fragment, and tags automatically.
How the Asset Resolver works
Before each generation, the resolver scans the segment script and matches assets by name or aliases. Detection scores are transparent:
| Match type | Score |
|---|---|
| Exact name match | 100% |
| Exact alias match | 80% |
| Partial match | 50% |
Detected assets are assigned to ComfyUI slots in a fixed order:
- Character 1 → Node 29 (Presenter — main identity)
- Character 2 → Node 84 (Secondary reference)
- Character 3 → Node 85 (Tertiary reference)
- Object → Node 83 (Polyvalent slot)
- Location → Node 30 (Background)
A nice touch: if a segment doesn’t mention any location but a previous segment did, the resolver automatically inherits the last detected background — sticky background keeps visual consistency across scenes.
V2V Editor: Retouch Without Regenerating
The Video-to-Video Editor is a post-production tool that lets you retouch an existing video using text prompts and reference images, without regenerating the whole clip from scratch. It’s perfect for changing a character, swapping a background, or applying a new style to an already-rendered video.
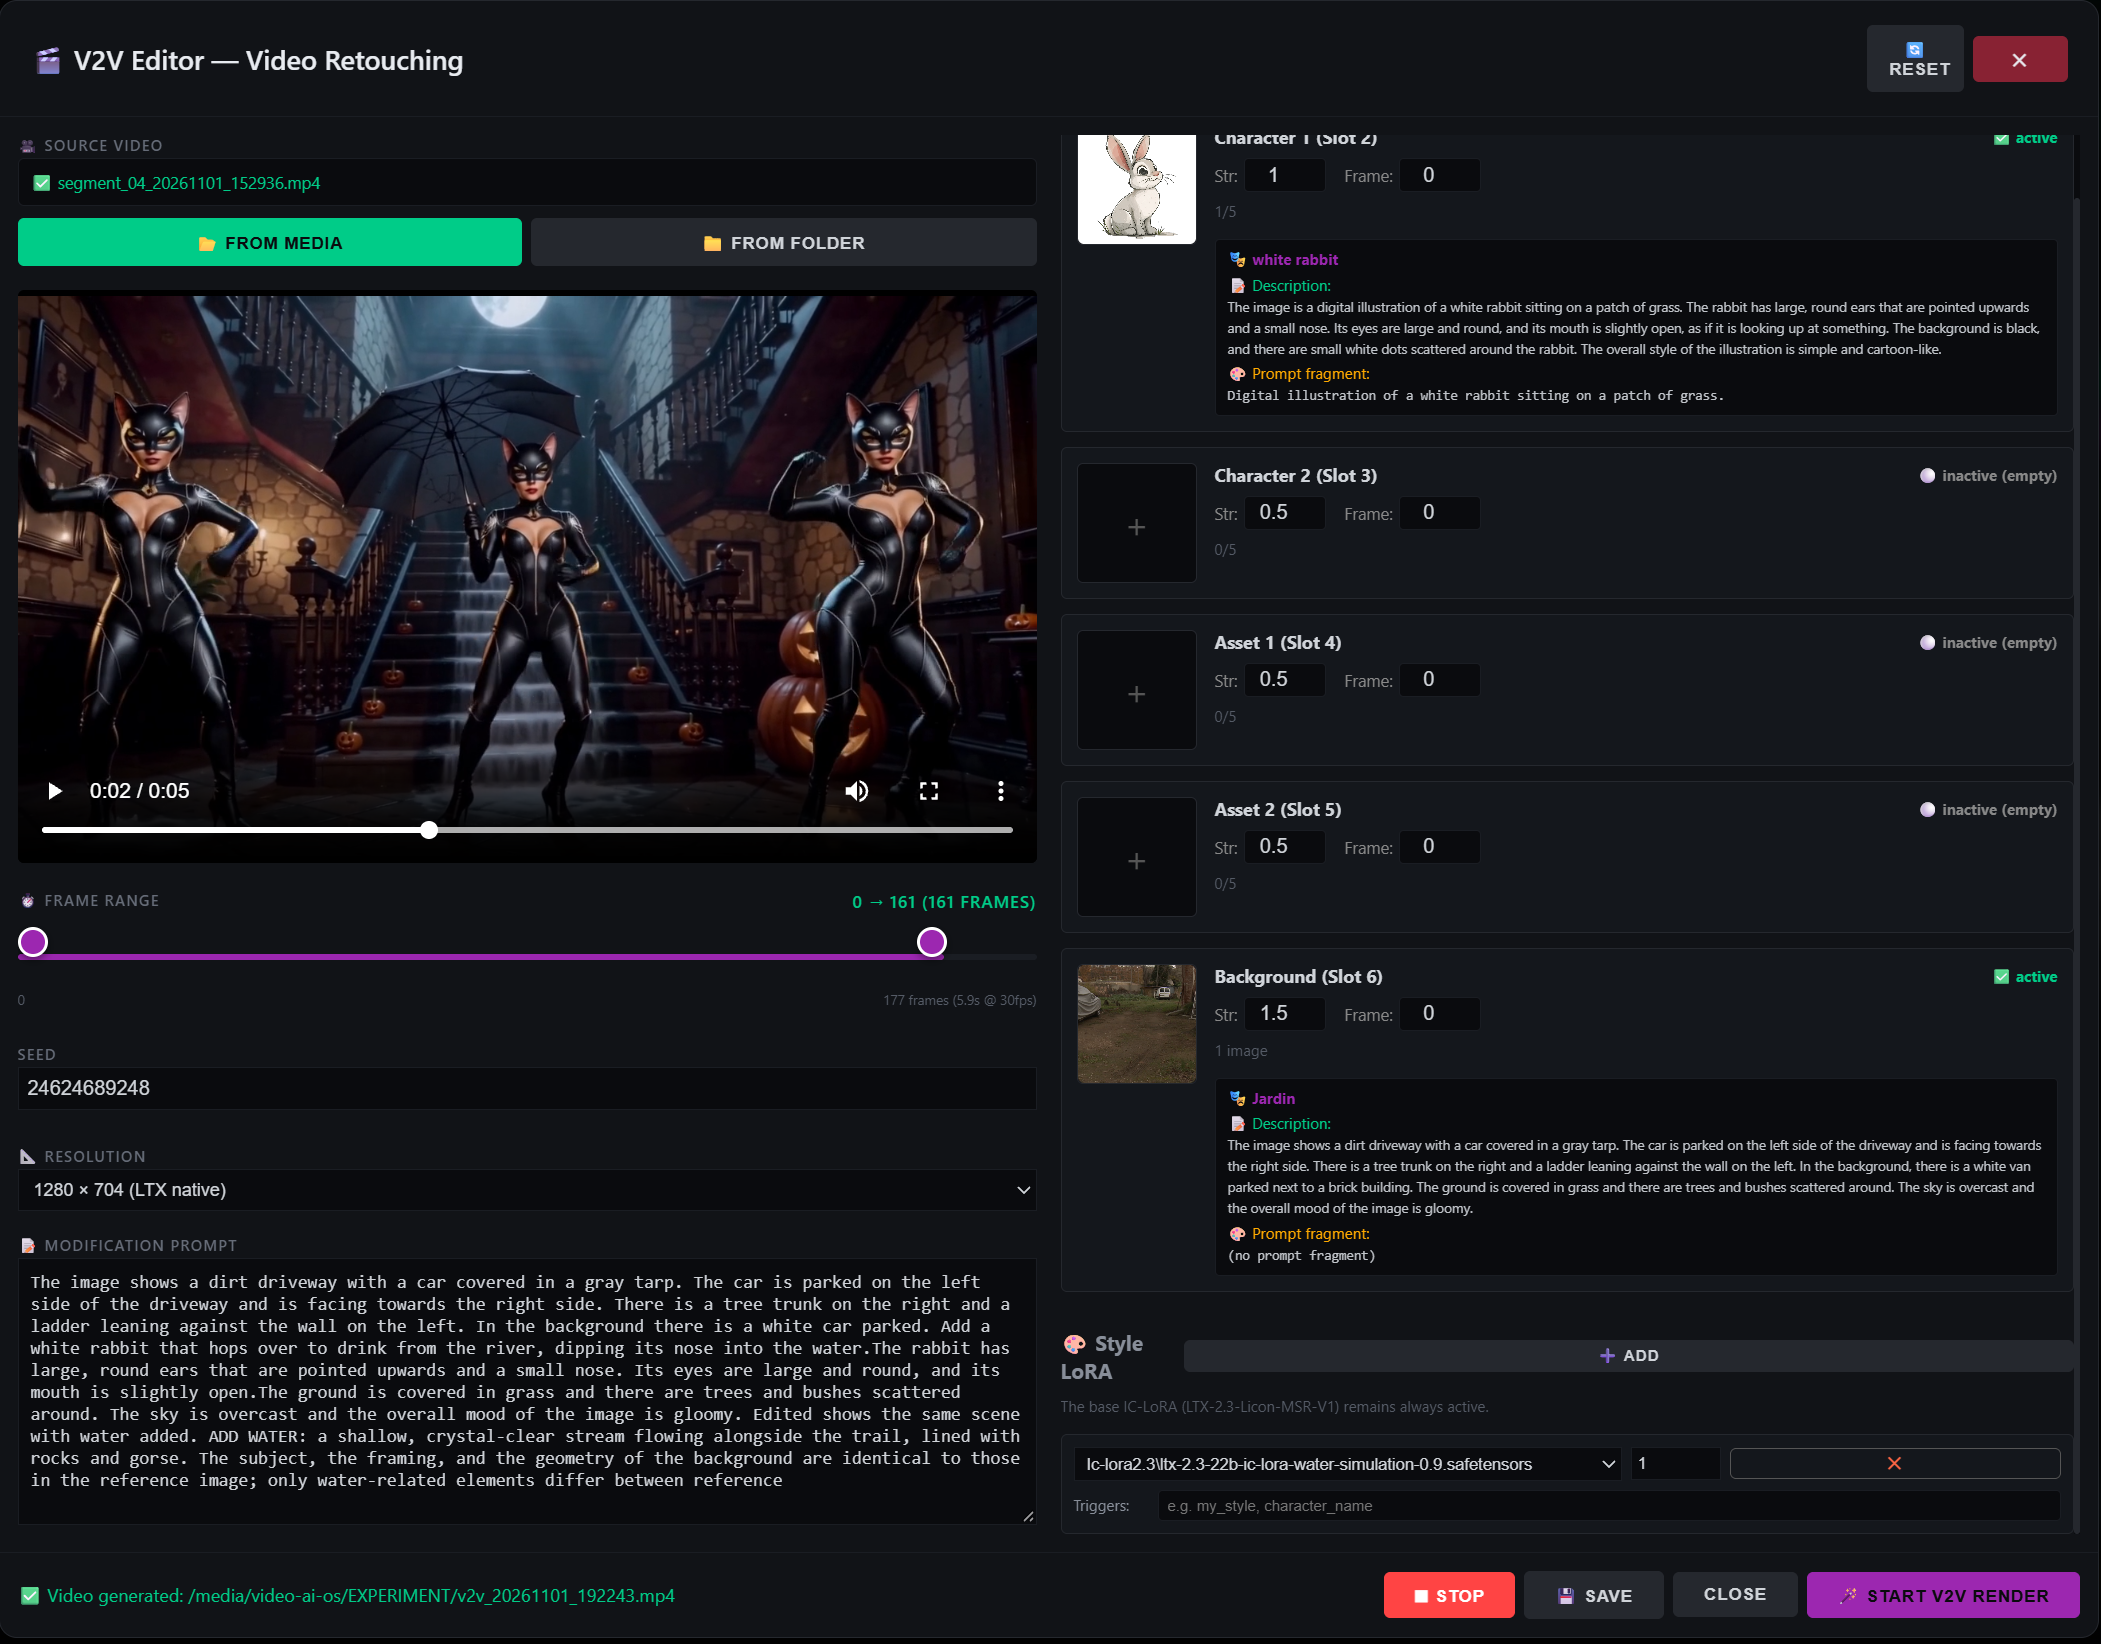
The editor uses five reference slots — Character 1 (Node 2), Character 2 (Node 3), Asset 1 (Node 4), Asset 2 (Node 5), Background (Node 6) — each with up to five images, a strength value, and a frame index. Empty slots are automatically disabled, so you only fill what you actually need.
| Resolution | VRAM | Use case |
|---|---|---|
| 512×288 | ~6 GB | Quick test (very fast) |
| 768×448 | ~10 GB | Draft preview |
| 960×544 | ~12 GB | Light production |
| 1024×576 | ~14 GB | Standard 16:9 |
| 1280×704 (default) | ~18 GB | LTX native |
| 1536×864 | ~22 GB | High quality |
| 1920×1088 | ~24 GB | RTX 3090 / 4090 / 5090 |
A STOP button is always visible and always active. It uses a double mechanism (frontend abort + backend interrupt) — even if the browser freezes, the GPU is freed. The config auto-saves 800 ms after the last change, so you can close the modal at any time.
3D Compositing Studio: The 2D → 3D → 2D Pipeline
The 3D Compositing Studio bridges the gap between 3D generation (via Trellis.2) and 2D video production (LTX). Take a generated 3D model, place it on any background image, adjust its position, scale, and rotation with precision, and capture the final composite as a new 2D image — ready to be used as a Presenter or Background in your timeline.
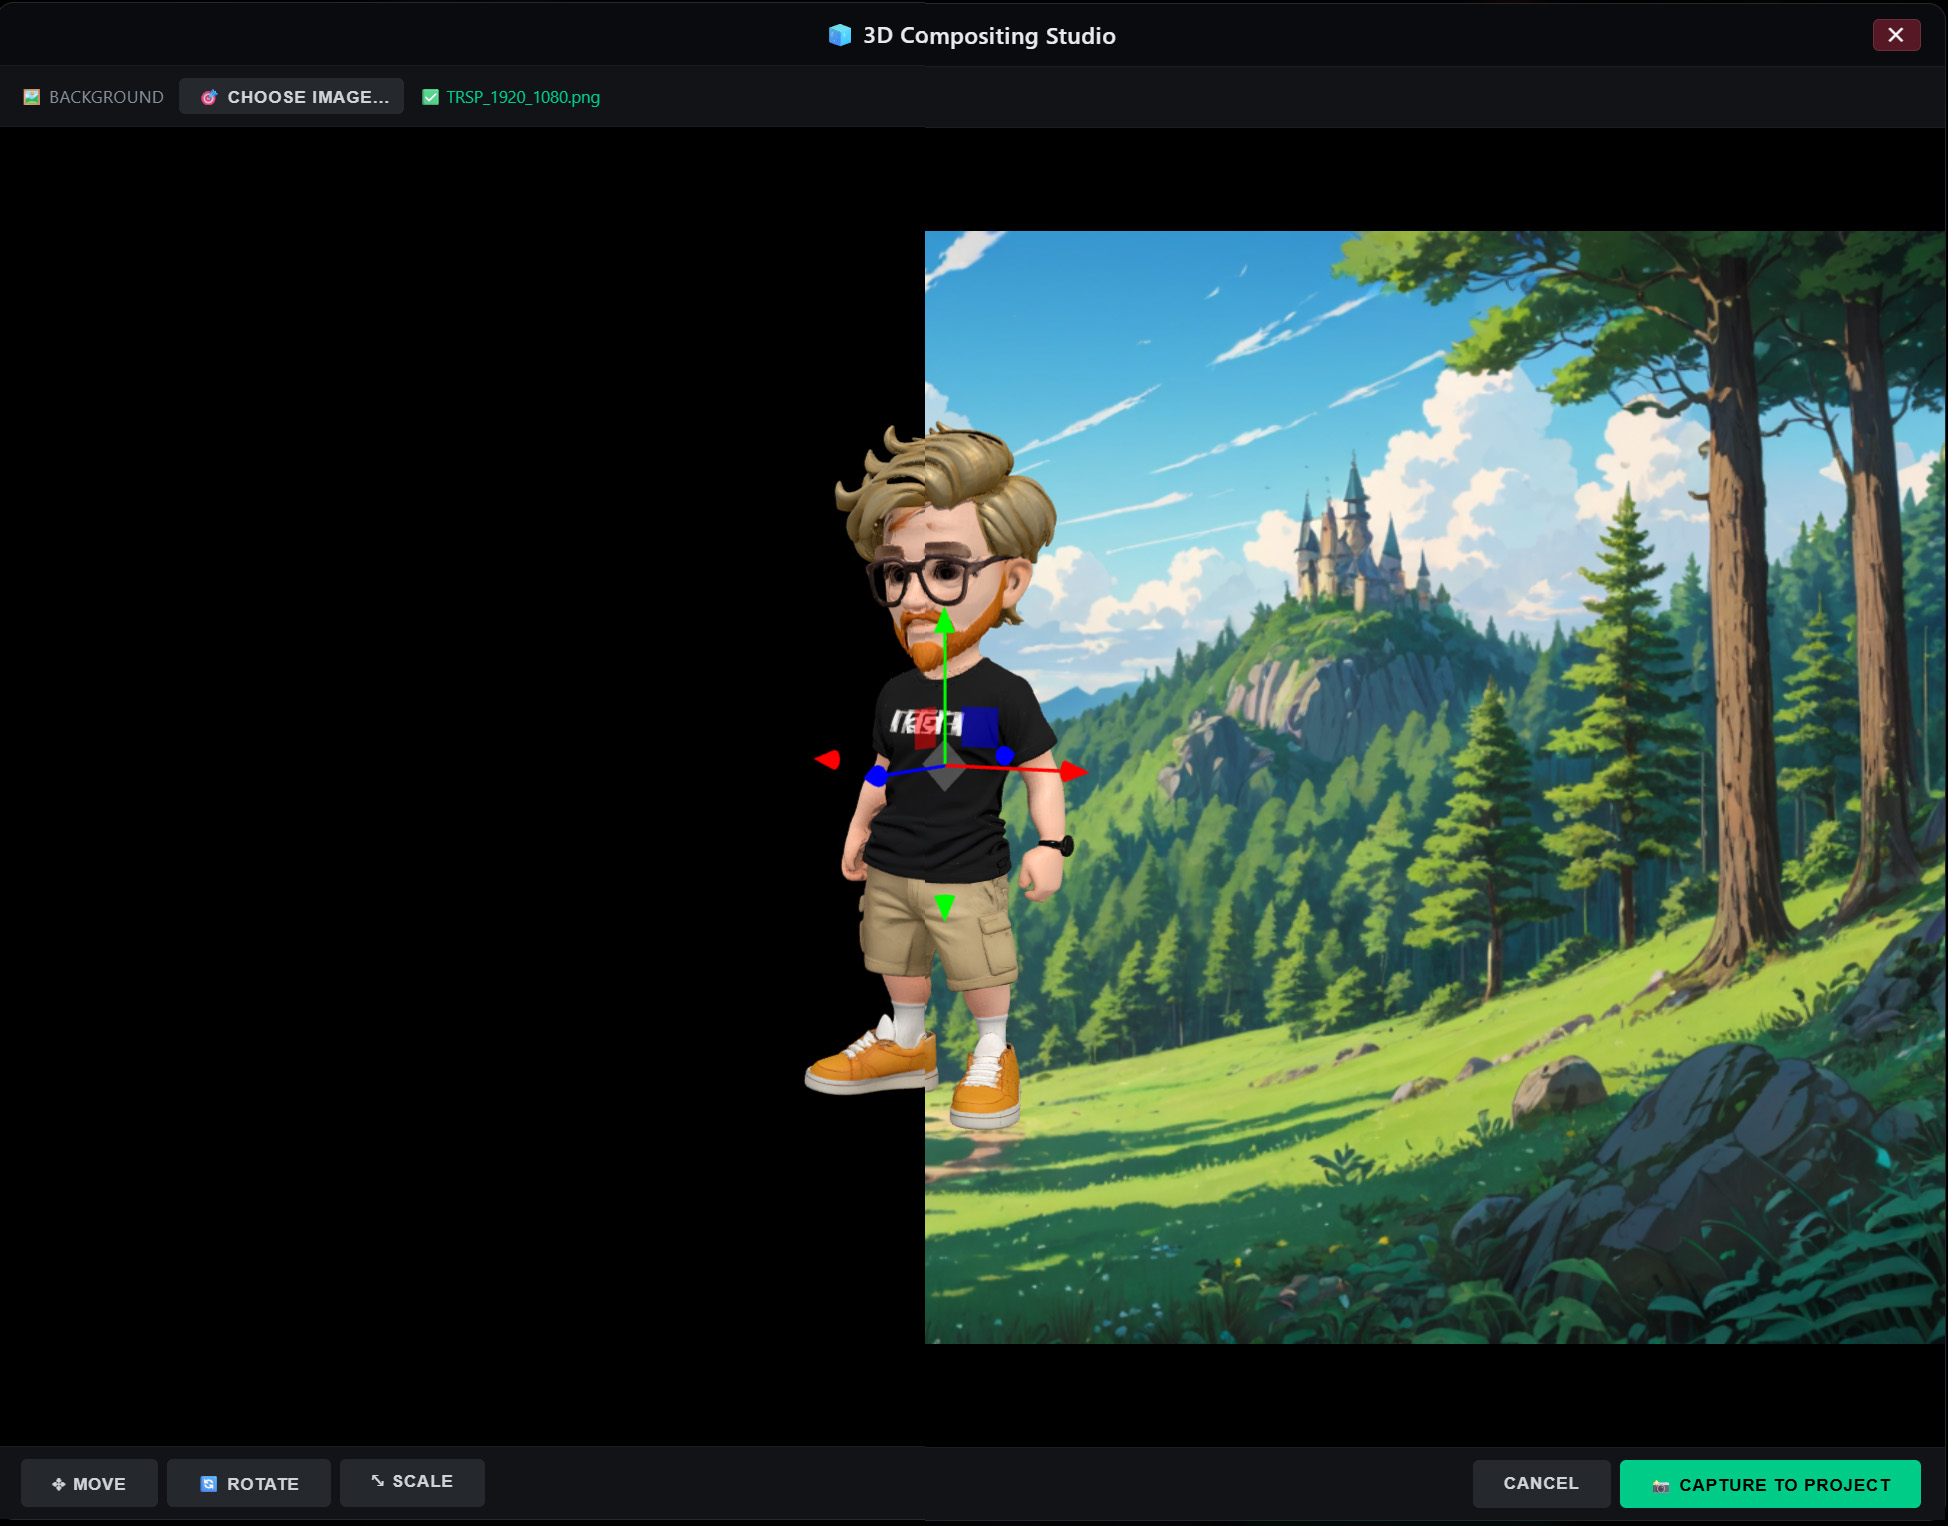
Navigation is Blender/3ds Max style: middle mouse to orbit, right mouse to pan, scroll to zoom. The transform gizmo uses familiar shortcuts — W to move, E to rotate, R to scale. Click a colored axis to constrain movement to that axis only.
When the model is perfectly placed, click Capture to Project: the studio hides the gizmos
and renders the final image at the exact resolution of the background, keeping the model’s exact position
and scale. The composite PNG is saved to your project’s /images/ folder and the Media grid
refreshes automatically.
NDI Monitor & FreeD Tracker: Broadcast Integration
The NDI Monitor streams a real-time video feed from any NDI source on your network — VSET3D, vMix, OBS, or any NDI camera — directly into LatentCore. Typical performance is 60 FPS for 720p sources. Click the camera button to capture the current frame and save it to the Media library with a timestamp.
The FreeD Tracker emulates a virtual PTZ camera and streams FreeD D1 packets (UDP) to 3D set software like VSET3D, Wasp3D, Vizrt, or Unreal Engine. LatentCore acts as the tracker; your 3D software receives the camera movements. Up to nine camera positions can be saved as presets per project, and the FreeD Overlay enables 3D-style navigation directly on the preview (left drag to pan, middle drag for pedestal, right drag for dolly/truck, wheel to zoom).
Pricing: Own Your Production, Forever
One payment. Unlimited videos. No tokens. No subscription. No surprises.
| Edition | Price | Highlights |
|---|---|---|
| Lite | 499 € | 720p · unlimited segments · 2 reference images · XML export |
| Pro (most popular) | 1 490 € | Up to 4K* · unlimited segments · 5 reference images · per-segment advanced parameters · installation support |
*4K requires 32 GB of video memory. Optional annual maintenance: 290 €/year (updates + priority support). A free demo lets you try all PRO features for 7 days, no credit card required.
Who Is It For?
Local TV Stations
A single editor can produce several bulletins a day — the same quality, without relying on the cloud.
Production Studios
Average video delivery time drops from days to hours, with no compromise on quality.
Corporate Teams
Create 200 training videos for a global rollout locally — cloud tokens alone would have cost over 80,000 €.
Education
Produce course material at scale, with full privacy and no per-minute billing.
A Typical 60-Second Video Workflow
- Create a new project (30 s)
- Upload the presenter image (30 s)
- Create a Character asset “Sonia” with Auto-Describe (1 min)
- Create a Location asset “Forest” (30 s)
- Set as PRESENTER (5 s)
- Fill in the TOPIC (10 s)
- Generate the script (1–2 min)
- Create the timeline (5 s)
- Test one segment (5–10 min)
- Check the asset badges and validate detected assets
- Adjust if needed
- Generate all videos (30–60 min)
- Open the V2V Editor if a segment needs retouching (5–15 min)
- Save (5 s)
Ready to own your production?
Try the free demo first — no credit card, no commitment. Or contact the team for a personalized walkthrough.
Leave a Reply
You must be logged in to post a comment.