
Latent Core User Guide
Everything you need to create AI-powered videos — from your first project to advanced asset management, virtual camera control, NDI monitoring, and V2V video retouching. No technical skills required.
Welcome
Latent Core is an AI-powered video production studio. It allows you to:
- Write scripts automatically from a simple topic or a PDF
- Generate videos with a virtual presenter (on green screen)
- Manage a library of Assets (characters, locations, objects)
- Automatically detect assets in your script and inject them into the generation
- Capture frames from any preview to use as references
- Control a virtual camera in your 3D set software via FreeD
- Monitor any NDI source in real time
- Retouch existing videos using the new V2V Editor New
- Broadcast your videos (VLC, OBS, VSET3D)
Launching the Application
2.1 Prerequisites
Before launching, make sure the following services are running:
| Service | Role |
|---|---|
| Ollama | The AI that writes scripts |
| ComfyUI | The video generation engine |
| SearXNG (optional) | Web search for the chat |
| NDI Runtime (optional) | For NDI Monitor and FreeD features |
2.2 Startup
- Double-click on
RUN.batin theC:\LatentCore\folder - A black window opens (this is normal, don’t close it)
- Wait a few seconds until it shows
Application startup complete - Open your browser and go to
http://127.0.0.1:9001
Interface Overview
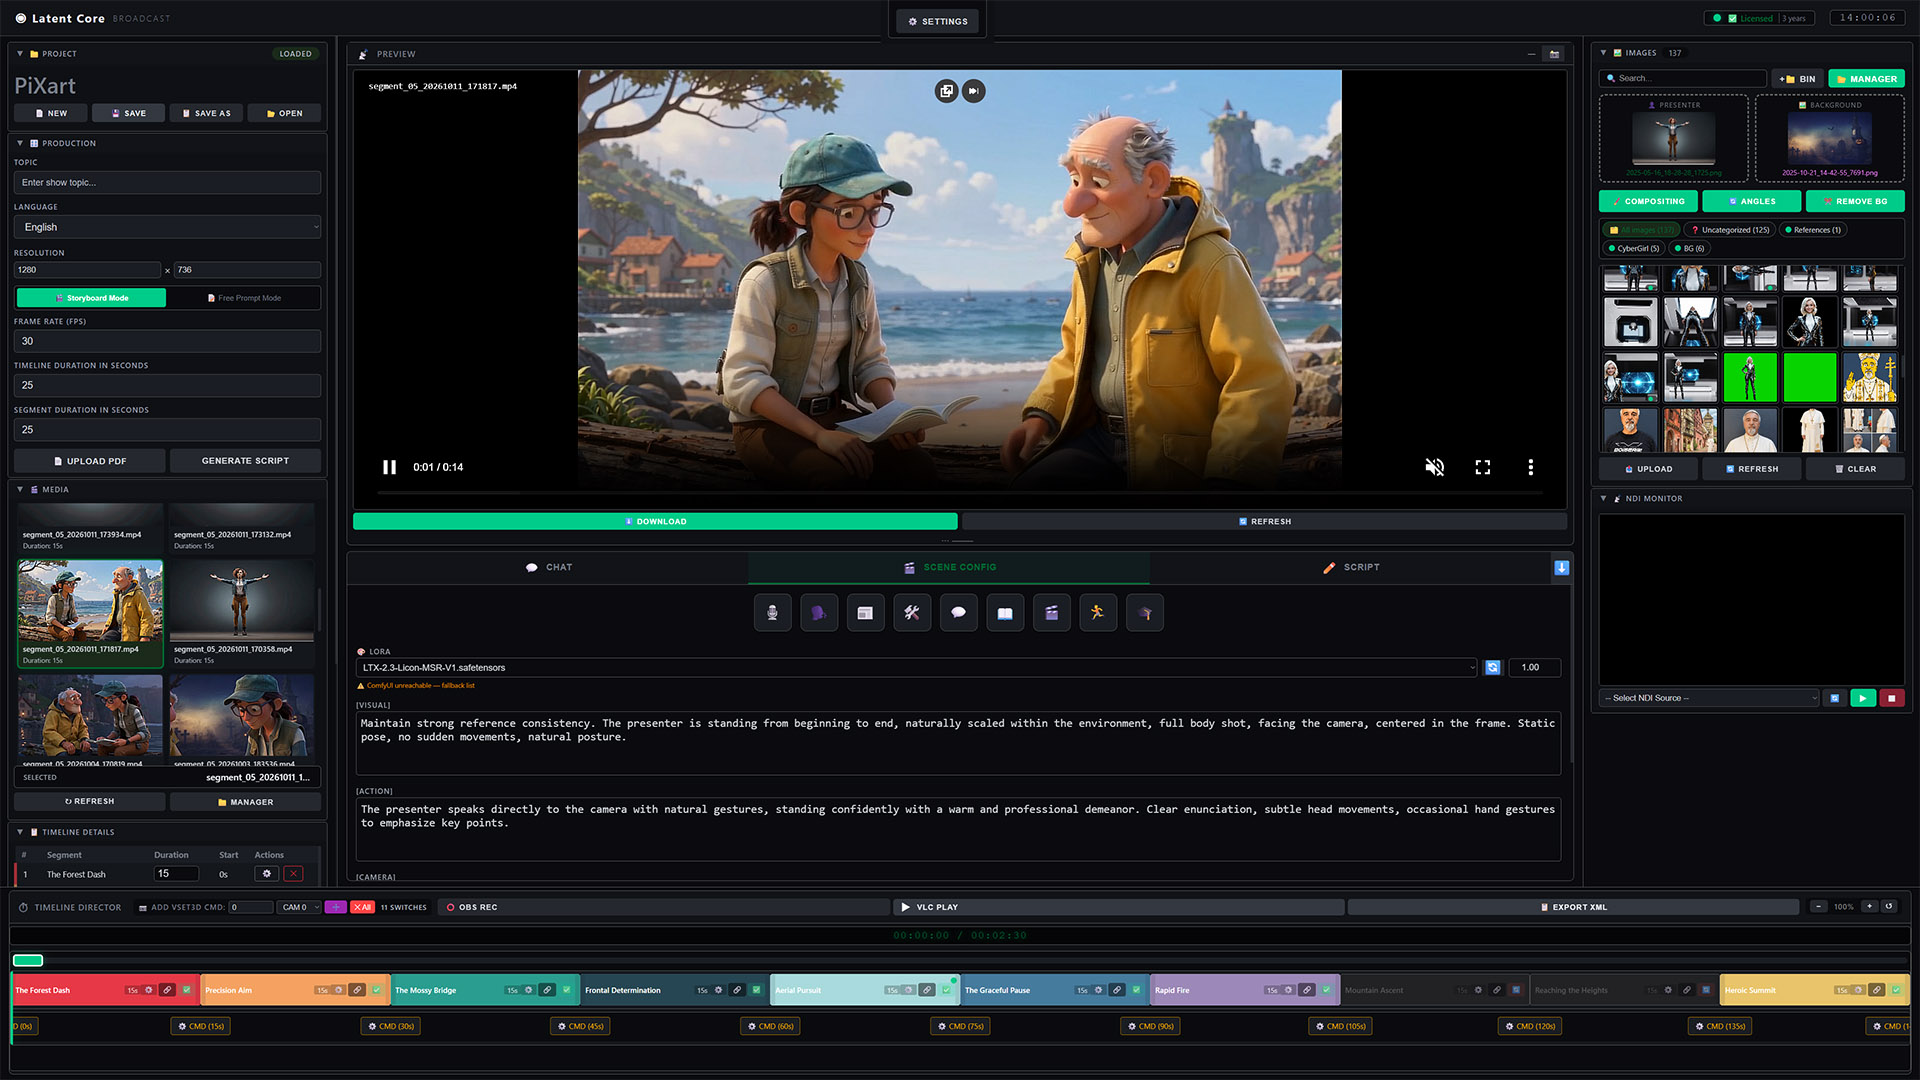
The screen is organized into 4 main areas:
Left Panel — Controls
- PROJECT: create, save, open a project
- PRODUCTION: topic, resolution, duration → generate a script
- MEDIA: list of generated videos
- TIMELINE DETAILS: segment breakdown
- VSET3D CMD: camera switch commands
Central Area
Video preview (top) and three tabs:
- CHAT: converse with the AI
- SCENE CONFIG: configure the visual style, LoRA, camera behavior
- SCRIPT: view and edit the script
Right Panel
- Assets New: your characters, locations, and objects library
- Images: your reference photos with source filter (All / Images / Assets)
- Bins: folders to organize your images and assets
- NDI Monitor New: real-time network video monitor
- FreeD Tracker New: virtual camera control for 3D sets
Timeline (bottom)
Your video segments aligned in time. Controls: Play, Stop, OBS Record, Export XML.
Creating Your First Project
Step 1 — Name the project
- In the left panel, section PROJECT
- Click NEW
- Type a name (e.g.,
My_First_Project) - Confirm
The name appears in large text in the panel.
Step 2 — Check the settings
In PRODUCTION:
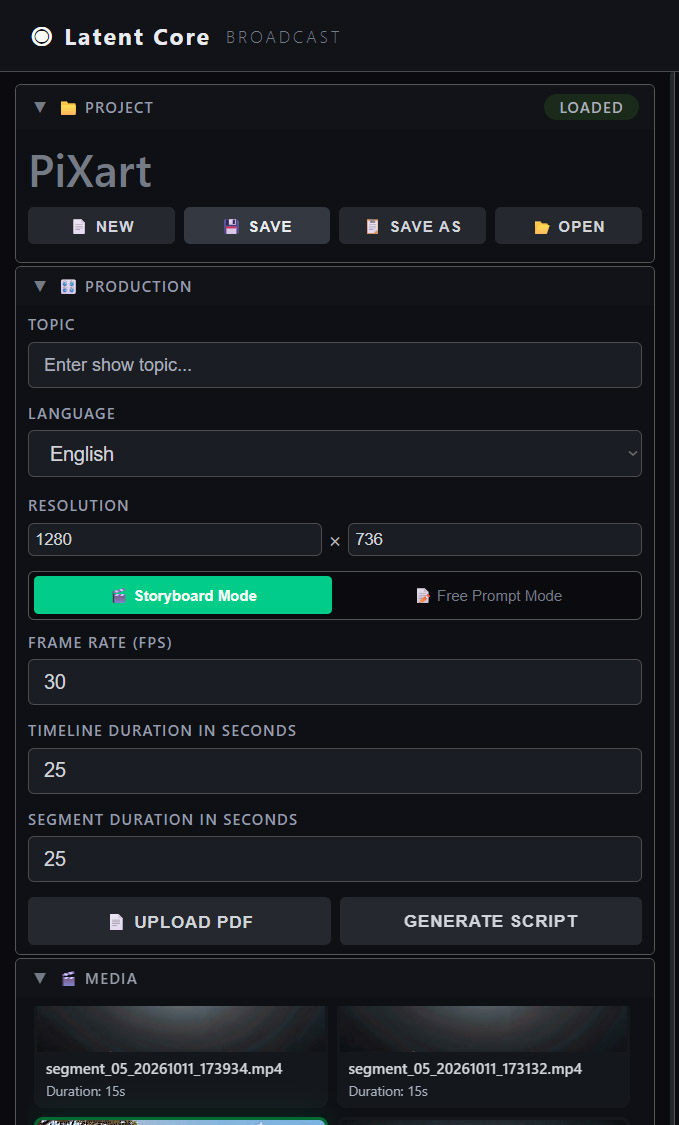
| Setting | Recommended value | Explanation |
|---|---|---|
| TOPIC | (fill in later) | The subject of your video |
| RESOLUTION | 512 × 300 | Video dimensions |
| FRAME RATE | 30 fps | Frames per second |
| TIMELINE DURATION | 60 | Total duration in seconds |
| SEGMENT DURATION | 15 | Duration of each scene |
| LANGUAGE | English | Script language |
Step 3 — Choose the generation mode
At the top of PRODUCTION, you’ll find a toggle:
- Storyboard — The AI writes everything from a topic
- Free Prompt — You provide a more detailed brief
To get started, choose Mode Storyboard.
Images & Media
Your presenter needs a reference image. The Images panel is also your central media library, now merged with asset images.
Source filter New
At the top of the Images panel, three chips let you filter by source:
| Chip | Shows |
|---|---|
| 🌐 All | Everything — Images + Assets |
| 🖼️ Images | Only the images you uploaded (from /images/) |
| 🎭 Assets | Only the images referenced by your Assets |
Asset images are marked with a 🎭 badge in the top-left corner.
Step 1 — Upload an image
- In the right panel, section IMAGES
- Click UPLOAD
- Select a photo of your character (neutral or transparent background recommended)
- The image appears in the grid
Step 2 — Set as presenter
Two methods:
Drag & drop the image onto the PRESENTER zone.
Double-click the image in the grid.
The PRESENTER zone now shows your image.
Step 3 — Choose a background
Drag an image onto the BACKGROUND zone.
Capturing a frame from the preview New
You can capture the current frame of the video preview and send it directly to the Media library:
- Play a video in the central preview
- Click the 📸 button in the PREVIEW header
- The frame is saved to
projects/<project>/images/with a timestamp - The Media grid refreshes automatically
Generating a Script
Method 1 — Storyboard (simplest)
- In PRODUCTION, fill in TOPIC
- Check the duration (60s by default)
- Click GENERATE SCRIPT
- Wait 30–90 seconds
Method 2 — Free Prompt (more powerful)
- Switch to Free Prompt
- Fill in the BRIEF with a description, visual prompts, or both
- Set the number of scenes (5 by default)
- Click GENERATE SCRIPT
- Review the preview → APPLY TO TIMELINE
Creating the Timeline
Once the script is generated:
- Go to the SCRIPT tab
- Click CREATE TIMELINE
The bottom timeline fills with your segments:
What you see on each segment
- Its title and duration
- An override dot if the segment has custom settings
- A 🎭 asset badge New showing how many assets are detected (green = validated, orange = needs validation, purple = manual overrides)
- Four action icons (see §9)
Generating Videos
Method 1 — Segment by segment (recommended)
- Right-click a timeline segment
- Choose Regenerate
- Wait 30 seconds – 15 minutes
- The video appears on the segment
Method 2 — All at once
- In SCRIPT, click GENERATE VIDEOS
- All videos generate one after another
- Follow progress in the chat
What happens behind the scenes New
Before each generation, LatentCore automatically:
- Scans the segment script for known assets (characters, locations, objects)
- Assigns detected assets to ComfyUI slots (nodes 29, 84, 85, 83, 30)
- Injects asset prompt fragments into the generation prompt
- Sends the workflow to ComfyUI and waits for the video
Refining and Regenerating
Editing the script
- Open the SCRIPT tab
- Edit the text directly
- Click UPDATE SCRIPT
Segment action icons
Each segment in the timeline has four icons:
| Icon | Action |
|---|---|
| 🎭 | Open the Segment Assets modal (see below) |
| ⚙️ | Advanced Segment Settings (override panel) |
| 🔗 | Link a video from the Media library |
| 🔄 | Regenerate this segment |
Segment Assets modal New
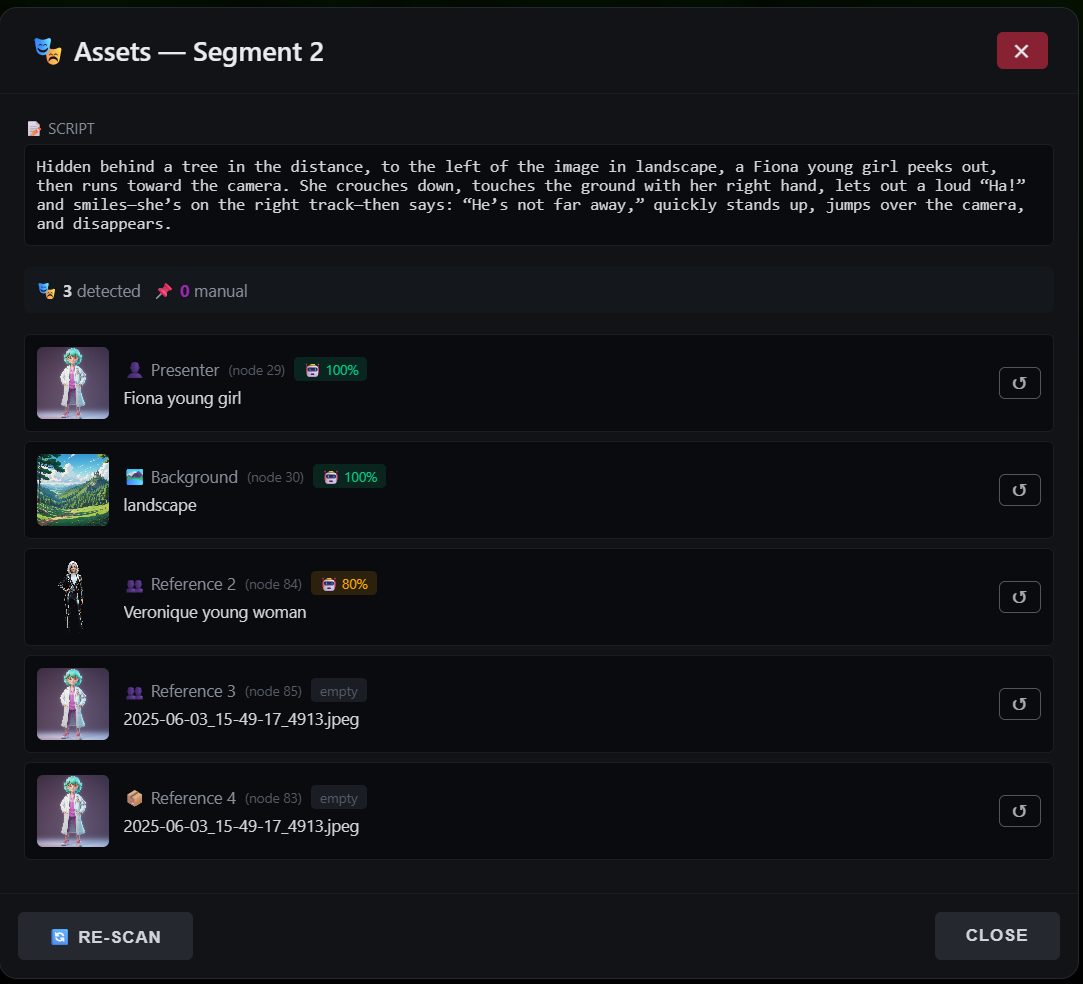
Click the 🎭 icon on any segment to open the Segment Assets modal. It shows:
- Which assets are detected in this segment (with confidence score)
- Which assets are inherited from a previous segment (sticky background)
- Which slots are manually overridden
- The exact image used for each ComfyUI slot (node 29, 30, 83, 84, 85)
Available actions:
- 🔄 Re-scan — Re-run the asset resolver
- ✅ Validate — Confirm new assets (only if validation needed)
- ↺ (per slot) — Clear the override for this slot
- 🗑️ Clear all — Remove all overrides for the segment
Overrides — Advanced customization
In the Override panel (⚙️ icon), you can:
- Change the presenter image for this segment
- Change the background for this segment
- Modify the dialogue for this segment only
- Add reference images (up to 5 total)
- Configure the scene (visual, action, camera, audio)
- Set a specific seed
- Choose between Mode A (Storyboard) and Mode B (Free Prompt)
Mode A — Storyboard: The prompt is built automatically from the segment script + SCENE CONFIG + asset fragments.
Mode B — Free Prompt: You write the prompt manually. Asset fragments are still injected intelligently (only if not already mentioned in your prompt).
Asset Manager New
The Asset Manager lets you build a library of characters, locations, and objects that the AI can detect in your scripts and use automatically during video generation.
Opening the Asset Manager
Click the 🎭 ASSETS button in the Images panel header. The Asset Manager modal opens with 5 tabs:
| Tab | Purpose |
|---|---|
| 👤 Characters | People (presenters, actors, avatars) |
| 🏞️ Locations | Backgrounds, sets, environments |
| 📦 Objects | Props, items, accessories |
| 🔗 Shared | Assets shared globally across all projects |
| ⚙️ Node 83 | Configure the behavior of the polyvalent slot |
Creating an asset
- Click + New Asset
- Fill in the Name (e.g., “Sonia”)
- Choose the Category (Character, Location, Object)
- Add Aliases (comma-separated): “she, her, the biologist”
- Add Tags: “human, female, scientist”
- Click 💾 Create
Adding reference images
In the asset editor, three options are available:
Upload a new image from your disk.
Pick an image from your existing project library (with source filter, bin filter, and search).
Capture the current frame of the video preview.
Auto-Describe New
If your asset has at least one reference image, you can click 🤖 Auto-Describe from Image. LatentCore sends the image to ComfyUI (Florence-2 + WD14) and automatically fills in:
- Description — A full sentence describing the image (used by the LLM)
- Prompt Fragment — A short version injected into the ComfyUI generation prompt
- Tags — A list of visual keywords (human, female, glasses, labcoat…)
Versioning
Each asset has a version history. When you edit an asset, you have two buttons:
| Button | Action |
|---|---|
| 💾 Save | Updates the current version in place (no history) |
| 📚 Save as New Version | Creates a new version, keeps the previous one accessible |
You can restore any previous version from the 📚 Version History section.
Share globally
Click 🔗 Share on an asset to add it to the global registry. It becomes available in all your projects via the 🔗 Shared tab.
Export / Import
- 📤 Export — Download all assets as JSON (light: metadata only / full: with images in base64)
- 📥 Import — Import a JSON file with three merge modes: merge, replace, or version
How the Asset Resolver works New
Before each video generation, the resolver scans the segment script and matches assets by name or aliases. The detection scores are:
| Match type | Score |
|---|---|
| Exact name match | 100% |
| Exact alias match | 80% |
| Partial match | 50% |
Detected assets are assigned to ComfyUI slots in this order:
- Character 1 → Node 29 (Presenter — main identity)
- Character 2 → Node 84 (Secondary reference)
- Character 3 → Node 85 (Tertiary reference)
- Object → Node 83 (Polyvalent slot — see below)
- Location → Node 30 (Background)
Node 83 modes
Node 83 is polyvalent. In the ⚙️ Node 83 tab, you can choose what it receives:
- Object / Prop (default) — The matched object from the script
- 4th Character Angle — A fourth character (if the script mentions 4+)
- Style Reference — Reserved for future use
This setting is configurable per project or globally.
Sticky background between segments
If a segment doesn’t mention any location but a previous segment did, the resolver automatically inherits the last detected background. This keeps visual consistency across scenes.
Validation
The first time an asset is detected in a segment, LatentCore asks for validation. Click ✅ Confirm & Generate to approve and continue, or ❌ Cancel to abort.
Organizing Your Images (Bins)
Bins are like folders for classifying your images — including asset images.
Creating a bin
- Open the IMAGES panel
- Click + BIN
- Type a name (e.g., “Characters”)
- The bin appears at the top of the grid
Adding images to a bin
Drag an image onto the bin.
Right-click an image → Add to a bin → choose.
1. Click MANAGER · 2. Check several images · 3. Right-click → Add selection to a bin.
Filtering by bin
- Click a bin at the top → the grid only shows its images
- Click All to see everything
- Click Unclassified to see images without a bin
NDI Monitor New
The NDI Monitor streams a real-time video feed from any NDI source on your network (like VSET3D, vMix, OBS, or any NDI camera) directly into LatentCore.
Selecting a source
- Open the 📡 NDI MONITOR section in the right panel
- Click 🔄 to scan the network
- Select a source from the dropdown
- Click ▶ to start streaming
Live statistics
The monitor displays the current FPS and dropped frames in the browser console. Typical performance: 60 FPS for 720p sources.
Capturing a frame New
Click the 📸 button in the NDI Monitor header to capture the current frame and save it to the Media library with a timestamp. Perfect for capturing a set design, a character pose, or a reference from your 3D software.
FreeD overlay navigation
Click the 🎮 NAV button to enable mouse-driven navigation (see next section).
Stopping the stream
Click ⏹ to stop. The connection reconnects automatically if interrupted.
FreeD Tracker New
The FreeD Tracker emulates a virtual PTZ camera and streams FreeD D1 packets (UDP) to a 3D set software like VSET3D, Wasp3D, Vizrt, or Unreal Engine. It’s an output-only protocol — LatentCore acts as the tracker, your 3D software receives the camera movements.
Configuration
Set the target IP, port, and camera ID in settings.json → freed:
Starting the stream
- Open the 🎥 FREED TRACKER section in the right panel
- Click ▶️ Start Streaming
- The status changes to
streaming(green)
Virtual joystick
Drag the joystick with your mouse to control Pan and Tilt. The further you push, the faster the movement (progressive acceleration).
| Control | Action |
|---|---|
| Joystick drag | Pan + Tilt (continuous while held) |
| Arrow keys | Pan + Tilt (keyboard) |
| 🔍+ / 🔍- | Zoom in / out |
| 🏠 Reset | Return to origin (pan=tilt=0, zoom=1) |
| Speed slider | Adjust base movement speed (0.1 to 1.0) |
Presets New
Save up to 9 camera positions (Pan, Tilt, Zoom, X, Y, Z) as presets:
- 💾 — Save current position to a slot
- ▶️ — Load a saved position (smooth animated transition)
- 🗑️ — Delete a slot
session.json, so each project has its own camera positions.FreeD Overlay — 3D-style navigation New
Click 🎮 NAV in the NDI Monitor to enable mouse-driven navigation on the preview:
| Gesture | Action |
|---|---|
| Left drag | Pan + Tilt |
| Middle drag | Pedestal (Y — up/down) |
| Right drag | Dolly (Z) + Truck (X) in world space |
| Alt + Left drag | Walk — camera-relative movement |
| Wheel | Zoom |
| Shift | Fast movement (×2.5) |
| Ctrl | Precision movement (×0.3) |
| Release | Inertia — the camera continues briefly |
Modes
Three navigation modes are available in the overlay top-left corner:
- Orbit (default) — Standard 3D software navigation
- FPS — First-person shooter style (simpler)
- PTZ — Real PTZ camera behavior (Pan + Tilt only)
V2V Editor New
The V2V (Video-to-Video) Editor is a post-production tool that lets you retouch an existing video using text prompts and reference images — without regenerating the whole clip from scratch. It’s perfect for changing a character, swapping a background, or applying a new style to an already-rendered video.
Opening the V2V Editor
Click the 🎬 V2V EDITOR button in the Images panel header (next to Compositing, Angles, Remove BG).
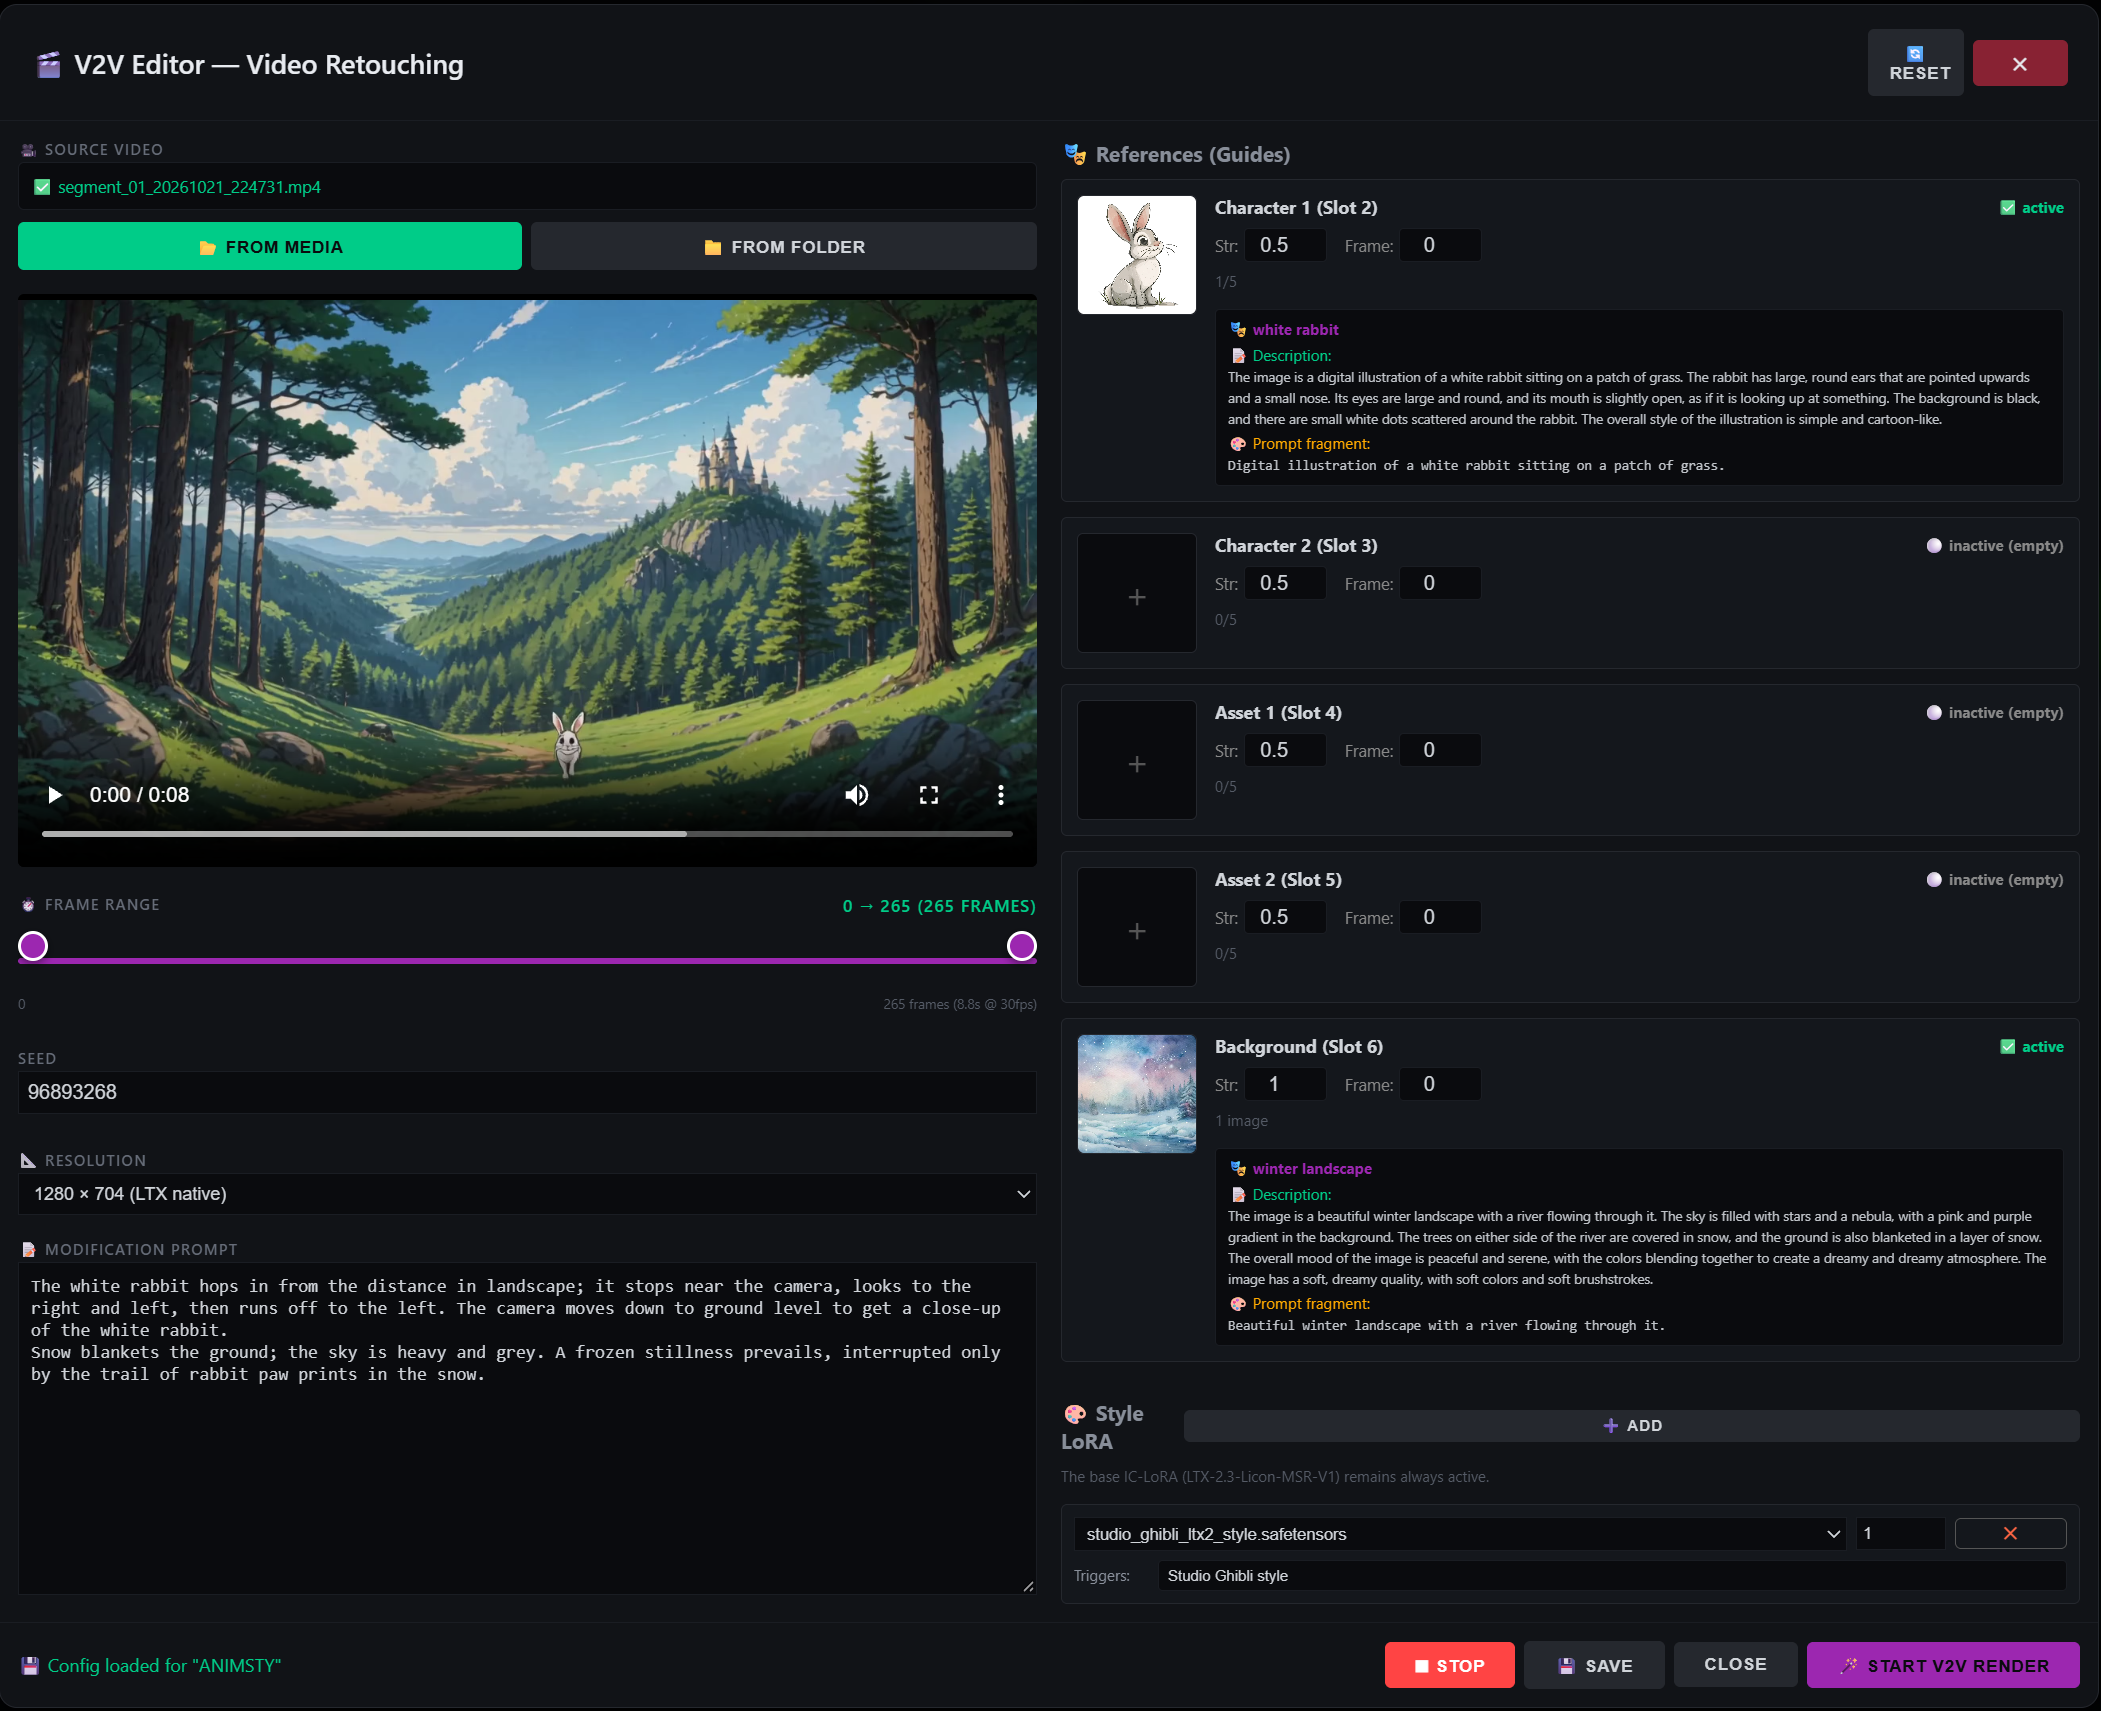
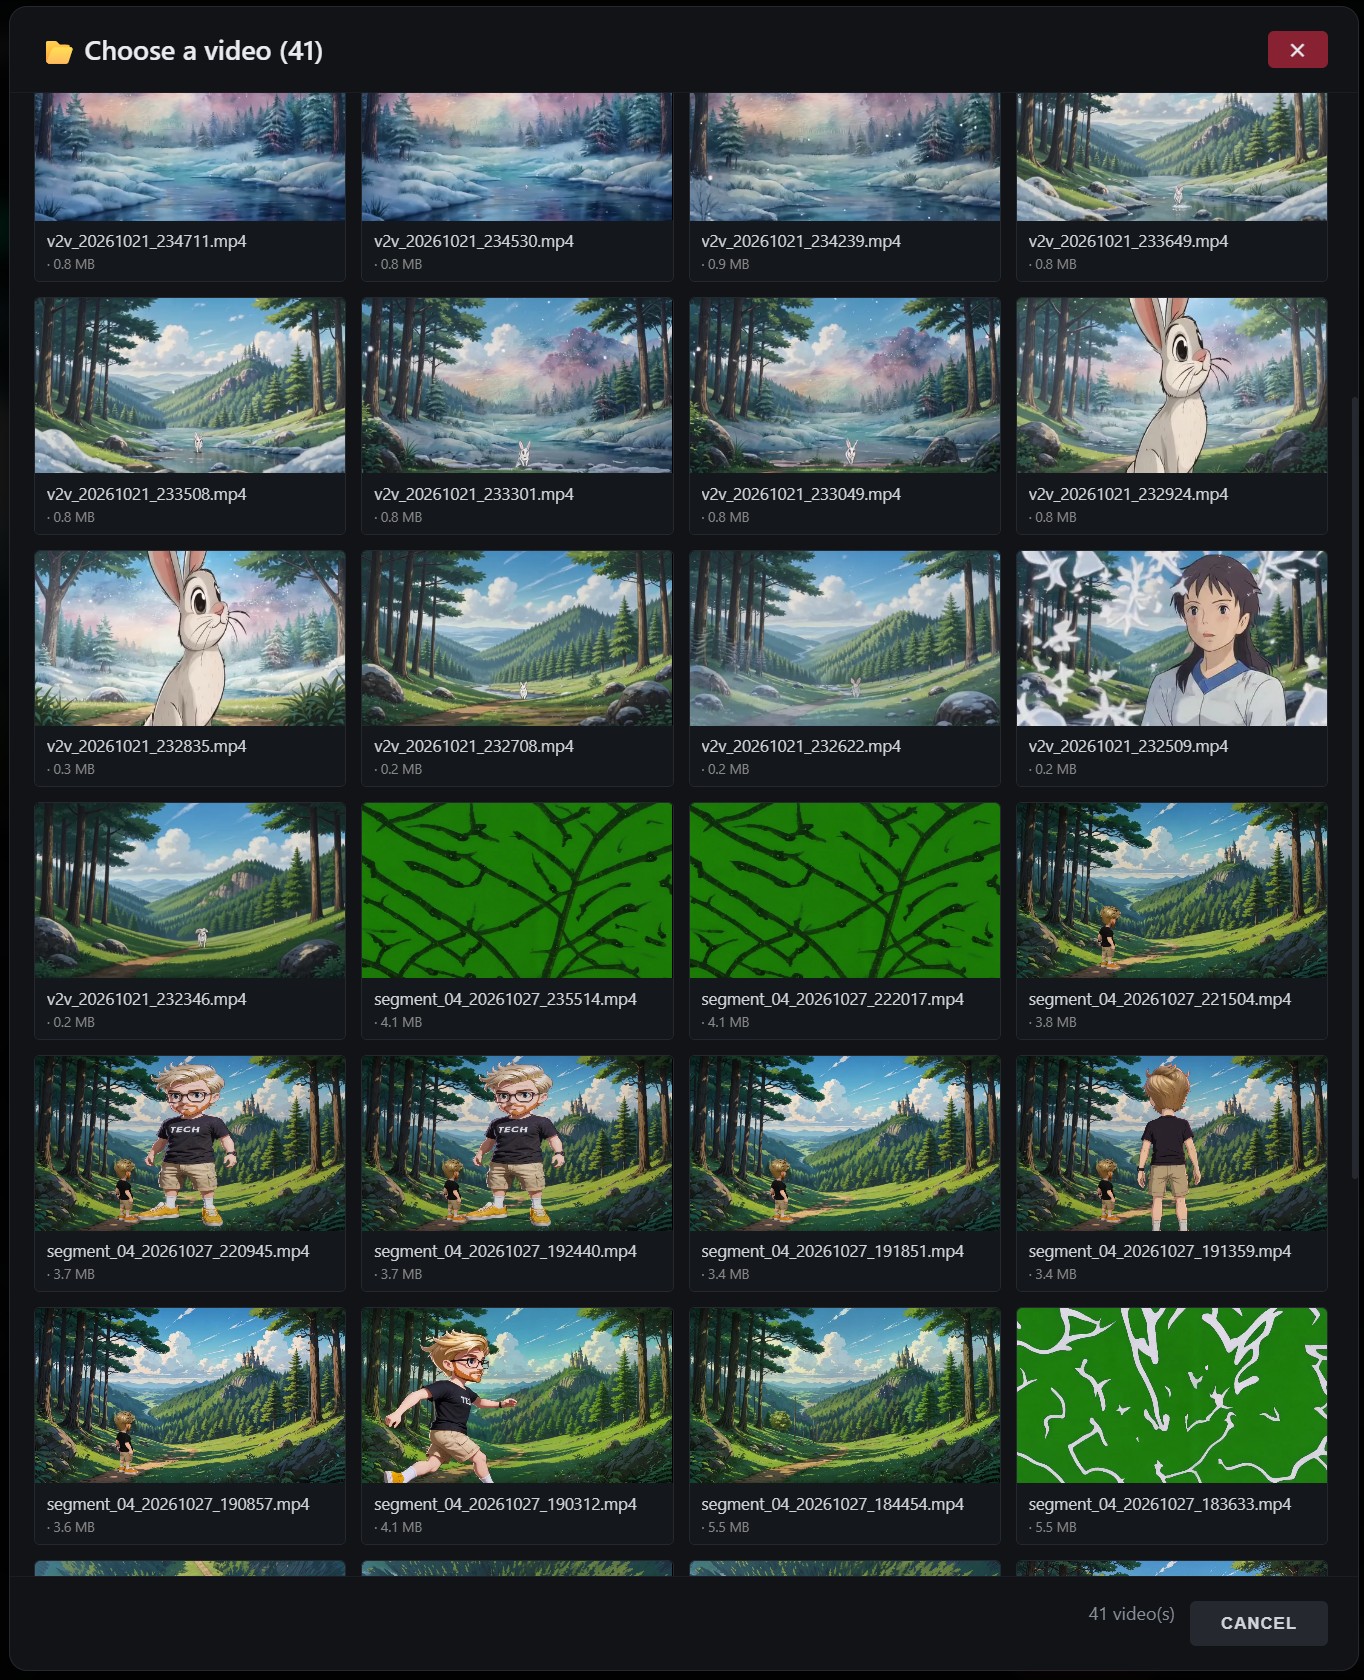
1. Choose the Source Video
You have two options to load a video:
| Button | Action |
|---|---|
| 📂 From MEDIA | Pick an existing video from your project’s media library. A grid with 16:9 thumbnails appears. |
| 📁 From folder | Upload a video from your local disk. It gets automatically copied to ComfyUI’s input folder. |
2. Trim the Video (Frame Range)
Use the double slider below the preview to select the exact portion of the video you want to retouch:
- Left handle: start frame (skip)
- Right handle: end frame
- The label above shows:
start → end (X frames) - The total frames are automatically calculated from the video duration × FPS
3. Write the Prompt
In the Modification Prompt box, describe what you want to change. Be specific about the subject, the action, and the style.
4. Assign Reference Images (Guides)
The V2V workflow uses 5 reference slots, each linked to a specific node in the ComfyUI workflow:
| Slot | Node | Purpose |
|---|---|---|
| Character 1 | Node 2 | Main character replacement |
| Character 2 | Node 3 | Second character replacement |
| Asset 1 | Node 4 | First object / prop |
| Asset 2 | Node 5 | Second object / prop |
| Background | Node 6 | Replace the environment |
For each slot:
- Click the thumbnail to open the sub-slot
- Assign up to 5 images per slot (Face, Back, Face 2, Full Back, Extra)
- Set the Strength (0 = disabled, 0.5 = normal, 5 = max)
- Set the Frame Index (at which frame the guide is injected)
5. Asset Descriptions
When you select an image for a slot, the editor automatically displays the asset description and prompt fragment below it. This helps you understand what the AI will “see” in the reference image.
6. Style LoRAs
Add up to N style LoRAs to influence the visual style. The base IC-LoRA (LTX-2.3-Licon-MSR-V1) is always active.
- Click ➕ Add
- Choose a LoRA from the dropdown
- Set its strength (0 = off, 1 = normal, 2 = strong)
- Repeat for additional LoRAs (they are chained in the workflow)
7. Resolution
Choose from 6 predefined resolutions:
| Resolution | VRAM | Use case |
|---|---|---|
| 512×288 | ~6 GB | Quick test (very fast) |
| 768×448 | ~10 GB | Draft preview |
| 960×544 | ~12 GB | Light production |
| 1024×576 | ~14 GB | Standard 16:9 |
| 1280×704 (default) | ~18 GB | LTX native |
| 1536×864 | ~22 GB | High quality |
| 1920×1088 | ~24 GB | (RTX 3090 / RTX 4090 / RTX 5090) |
8. Auto-Save
The V2V Editor automatically saves its configuration 800ms after the last change. The config is stored in session.json → v2v_config and is per-project.
9. Launch and Monitor
- Click 🪄 Start V2V Render
- The button becomes ⏳ Rendering… and disables
- The ⏹ STOP button (always visible) becomes active
- Follow progress in the browser console and the server log
10. Stop the Render
The ⏹ STOP button is always visible and always active. Clicking it will:
- Abort the HTTP request (AbortController)
- Send a
/interruptsignal to ComfyUI - Clear the ComfyUI queue
- Restore the UI immediately
11. Background Management
The V2V Editor automatically handles missing images:
- If a reference image is missing from
ComfyUI/input/, it is copied fromprojects/<project>/images/or/assets/ - If an image is completely missing, a fallback image is used
- All copied/replaced images are logged in the console
ComfyUI/input/ folder at any time — the V2V Editor will repopulate it automatically before each render.
12. Workflow Logging
When a render starts, the server logs the full workflow in the console:
- Summary: source video, resolution, frames, seed, prompt, guides, LoRAs
- Full JSON: the exact payload sent to ComfyUI
- Node-by-node modifications
3D Compositing Studio New
The 3D Compositing Studio lets you take a generated 3D model, place it on any background image, adjust its position/scale/rotation with precision, and capture the final composite as a new 2D image — ready to be used in your video timeline.
This bridges the gap between 3D generation (Trellis.2) and 2D video production (LTX).
How it works — The 2D → 3D → 2D pipeline
- Generate a 3D model from an image (via Trellis.2)
- Open the 3D Compositing Studio
- Pick a background from your project
- Place and adjust the 3D model (Move / Rotate / Scale)
- Capture the composite as a new 2D PNG
- Use that PNG as a Presenter or Background in LTX
Opening the Studio
From the Asset Editor:
- Open any asset with a generated 3D model
- Click 👁️ Preview 3D
- The Studio opens with your 3D model loaded
Choosing a Background
At the top of the Studio, click 🎯 Choose image… to open a mosaic picker. The mosaic shows every image from your project’s media library.
The 3D Navigation (Blender / 3ds Max style)
Once the model and background are loaded, you can navigate in true 3D:
| Action | Command |
|---|---|
| Orbit around the object | Middle mouse button + drag |
| Pan the view | Right mouse button + drag |
| Zoom in / out | Scroll wheel |
The Transform Gizmo (Move, Rotate, Scale)
To manipulate the 3D model itself, use the keyboard shortcuts and the visual gizmo:
| Key | Mode | Gizmo |
|---|---|---|
| W | Translate (Move) | Red/Green/Blue arrows |
| E | Rotate | Red/Green/Blue circles |
| R | Scale | Small colored cubes |
Click and drag a colored axis to constrain the movement to that axis only. This is identical to Blender or 3ds Max.
Capturing the Composite
When the model is perfectly placed on the background:
- Click 📸 Capture to Project
- The Studio hides the gizmos and renders the final image at the exact resolution of the background
- The 3D model keeps its exact position and scale from the preview
- The composite PNG is saved to your project’s
/images/folder - The Media grid refreshes automatically
Use Cases
Generate a character in 3D, rotate it to a 3/4 view, composite it on a forest background, and use the resulting 2D image as a presenter reference in LTX. You get 3D consistency with 2D generation speed.
Generate a prop (e.g., a vintage car) in 3D, place it exactly where you want on your background, and capture. LTX will treat this composite as a standard background image.
Because the capture uses the background’s exact aspect ratio and resolution, the result is always broadcast-ready. No more cropping or letterboxing surprises.
Using the AI Chat
The CHAT tab lets you converse with the AI.
Example requests
| You type | The AI does |
|---|---|
| “Rewrite scene 2 in a funnier style” | Modifies the script |
| “Add a scene about the risks” | Inserts a new segment |
| “Shorten the conclusion” | Modifies the text |
| “What is the Samhain festival?” | Web search + answer |
Web search
Enable the toggle (button to the right of the input area) to let the AI perform web searches.
Saving and Loading
Saving
- SAVE — saves to the current project
- SAVE AS — duplicates to a new project
What gets saved
- The script
- The timeline (segments + overrides)
- Selected images
- Bins
- Assets New — in
_assets.json - FreeD presets New — in
session.json - V2V config New — in
session.json → v2v_config - Settings
Loading
OPEN: displays the list of projects. Click a project to load it. Everything is restored: script, timeline, images, bins, assets, FreeD presets, and V2V config.
New project
NEW: creates a blank project. Warning: loses unsaved changes.
Tips and Best Practices
- Be specific in the TOPIC
- Use Mode B with a detailed brief for more control
- Review and adjust via the editor
- Use the chat to iterate
- Upload a good image of the presenter (neutral background, even lighting)
- Test one segment before generating everything
- Adjust SCENE CONFIG (visual, action, camera)
- Use overrides to customize
- Create the asset before generating videos
- Use 🤖 Auto-Describe to fill descriptions quickly
- Add aliases (she, her, the biologist) to improve detection
- Mark the best reference image as ★ Primary
- Share assets globally to reuse them across projects
- Trim the source video to the relevant segment (saves VRAM and time)
- Start small: use 512×288 to test the prompt, then scale up
- Fill only the slots you actually need — empty ones are auto-disabled
- Use 0.5 strength for characters and 0.6 for backgrounds (values above 2.0 risk overpowering the render)
- Test the prompt with the seed set to 0 first, then lock a good seed
- Use the ⏹ STOP button immediately if the preview looks wrong — no need to wait
- Create bins from the start: Characters, Backgrounds, References, Test
- Name your images clearly before uploading
- Regularly delete test images
- Use the search in the Manager to find things fast
- Save often (Ctrl+S or SAVE button)
- Use SAVE AS before major changes
- Don’t delete images used by a project or asset
- Use Export regularly to back up your assets
- Generate videos one at a time instead of batch for better control
- Use the seed to reproduce a good result
- Duplicate a project (SAVE AS) instead of starting from scratch
- Use FreeD presets for rapid camera movements
Troubleshooting
“ComfyUI unreachable”
Cause: ComfyUI isn’t running or is unreachable.
- Verify ComfyUI is running
- Test the URL in your browser
- Check
settings.json → comfy.hostandcomfy.port
“Ollama timeout”
Cause: Ollama is slow or overloaded.
- Verify Ollama is running
- Test with a simpler topic
- Check
settings.json → ollama.hostandollama.port
My asset isn’t detected in the script
Cause: The asset name or aliases don’t match the words in the script.
- Open the asset editor and check the Aliases field
- Add missing aliases (e.g., “she”, “her”, “the biologist”)
- Click 🔄 Re-scan in the Segment Assets modal
The wrong asset is used for a segment
Cause: Two assets share the same alias, or the resolver picked a lower-confidence match.
- Open the Segment Assets modal (🎭 icon)
- Check the confidence scores
- Override the wrong slot manually with the appropriate image
- Or remove the conflicting alias from the wrong asset
NDI Monitor shows “Disconnected”
Cause: The NDI streamer (ndi_streamer.py) isn’t running, or the network source is offline.
- Verify the NDI streamer window is open (a black window appears at startup)
- Check that the NDI source is active on the network
- Try refreshing with the 🔄 button
- Restart LatentCore if the streamer window shows an error
FreeD stream doesn’t reach my 3D software
Cause: Wrong IP, port, or firewall blocking UDP.
- Check
settings.json → freed.target_ipandtarget_port - Verify the 3D software is listening on that UDP port
- Check Windows Firewall — UDP outbound must be allowed
- Test with Wireshark: filter
udp.port == 40000
The video doesn’t appear
Cause: Rendering in progress or failed.
- Wait 5–15 minutes
- Check MEDIA to see if the video is there
- Check the server logs (black window)
- F5 the browser
- Click REFRESH
The project won’t load
Cause: Corrupted session.json file.
- Check
projects/<project>/session.json - If corrupted, restore from a backup
- As a last resort, recreate the project
The application is slow
Possible causes:
- Many images (130+) → normal, use bins
- Many segments → generate in small batches
- ComfyUI overloaded → wait
Solution:
- Close unnecessary tabs
- Clean old videos (CLEAR in Media)
- Restart the application
V2V render fails with “Invalid image file”
Cause: A reference image is missing from ComfyUI’s input folder, or has an incompatible format (RGBA, Palette).
- The V2V Editor automatically copies missing images from your project folder. Wait 2 seconds and retry.
- If it persists, open the image in a viewer to verify it’s not corrupted.
- Try re-uploading the image via the Images panel — LatentCore now converts all uploads to RGB 8-bit automatically.
- Check the server logs for
[COMFY] 📋 Copied '...'messages.
The V2V prompt seems to have no effect
Cause: The prompt is too vague, or the reference images don’t match the requested change.
- Be more specific (subject + action + style).
- Check that the reference images in the slots actually match the target subject.
- Lower the Strength if the reference image overwhelms the prompt (try 0.4–0.6).
- Test with only one slot filled to isolate the effect.
🎬 Typical Workflow — 60-second video
- NEW project (30s)
- Upload presenter image (30s)
- Create Character asset “Sonia” with Auto-Describe (1 min)
- Create Location asset “Forest” (30s)
- Set as PRESENTER (5s)
- TOPIC = “…” (10s)
- GENERATE SCRIPT (1–2 min)
- CREATE TIMELINE (5s)
- Test 1 segment (Regenerate) (5–10 min)
- Check the 🎭 badge on segments — validate detected assets
- Adjust if needed (variable)
- GENERATE VIDEOS (batch) (30–60 min)
- New Open V2V Editor if a segment needs retouching (5–15 min)
- SAVE (5s)
🎉 Congratulations!
You now know how to use Latent Core from A to Z — including the new V2V Editor, Asset Manager, NDI Monitor, and FreeD Tracker.
Good luck with your creations.
Latent Core — User Guide v1.2 — October 2026
“`